How to clone your hard drive in Windows 10 & 11
To clone a hard drive, you’ll need two different hard drives: a source drive and a destination drive. Hard drives can be an HDD (hard disk drive) or an SSD (solid-state drive). Hard drive cloning is the same whether you copy an HDD to an SSD, an HDD to an HDD, or an SSD to an SSD.
A desktop PC can have two or more internal drives, and some PCs contain multiple drives by default, meaning you can copy one internal hard drive to another without connecting an external drive. As far as how to clone a laptop hard drive, there isn’t usually enough space for two internal disks, so you’ll need to connect an external drive to copy your hard drive to it.
You can buy HDDs or SSDs at any computer retailer. See whether an SSD or HDD is best for you before purchasing. You’ll also need an adapter (SATA-to-USB usually), dock, or enclosure to connect your new secondary drive.
Before you begin, clean out your current drive. Over time, drives get bogged down with tons of unnecessary temporary data, caches, duplicate files, and apps you never use. The easiest way to get your drive sparkling is to use a specialized cleaning tool like AVG TuneUp, which will get rid of gigabytes’ worth of junk data and other unwanted files quickly and easily.
Once you’re all set up, you can begin to clone your Windows hard drive. Learning how to clone a hard drive starts with choosing the right hard drive cloning software.
1. Download and install a drive-cloning tool
Windows doesn’t have a built-in HDD cloner, so the best way to clone a hard drive is to use a free third-party option. We think the hard drive cloning software Macrium Reflect is the easiest way to clone a hard drive, but EaseUS is another popular option.
Macrium Reflect offers hard drive clone software for home (Reflect Home) and commercial (Reflect Workstation) purposes. In this article, we’ll use Reflect Home, which is available with a 30-day free trial without needing to enter payment details.
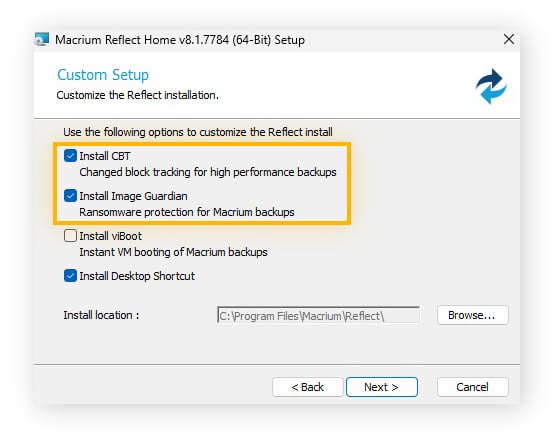
After downloading Macrium Reflect, run the setup wizard to install it. Note that it comes bundled with other software. Deselect the first two options during custom setup if you only want to install Reflect.
After installing Macrium Reflect, connect your secondary hard drive if necessary. You’re now ready to select the source drive and begin cloning your hard drive.
2. Select your source drive
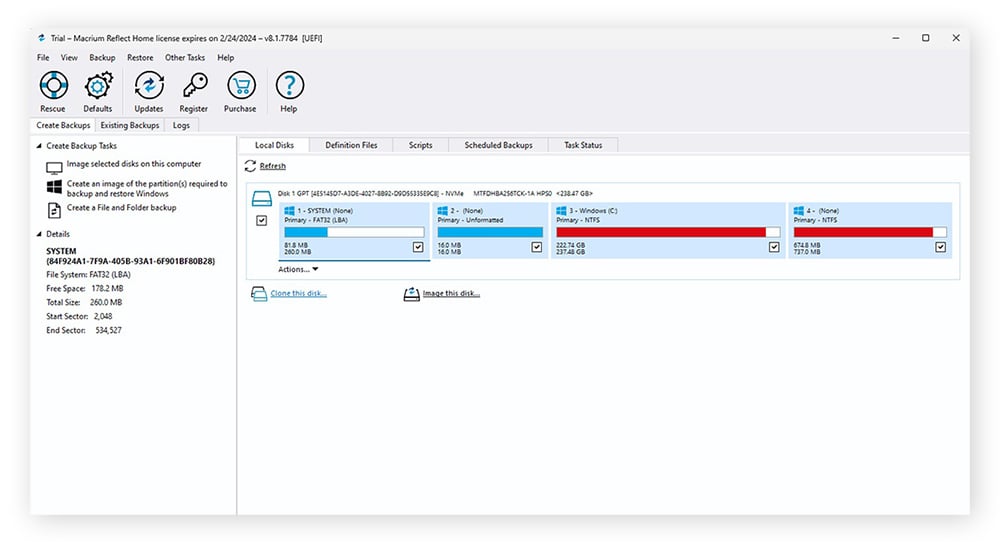
Select Create Backups > Local Disks. These options are already the default upon booting Macrium Reflect for the first time. Choose the hard drive you want to clone and click Clone this disk.
Mirroring a hard drive internally is also possible by clicking Image this disk. This option enables you to turn your hard drive into a compressed file that’s easier to store.
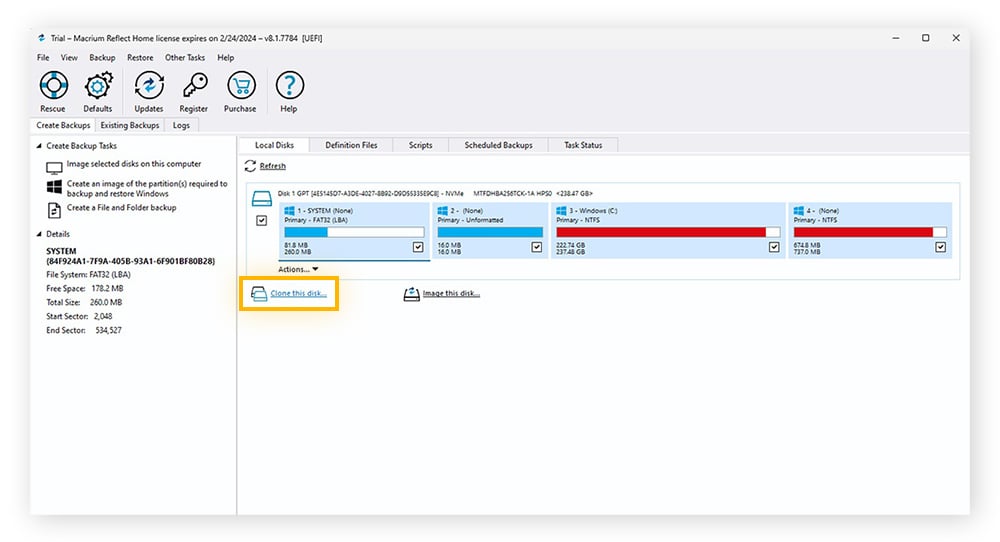
The Local Disks tab shows all your computer’s drives and their partitions. Windows sometimes creates small partitions of up to a few GB to house repair tools or boot utilities. You’ll need to copy those along with your data if you want your new drive to function independently. If not, just uncheck them.
3. Specify the clone destination
Click Select a disk to clone to, select the disk you are cloning your hard drive onto, and click Next.
Click Delete Existing partition if your secondary hard drive hasn’t been formatted yet — making sure you first back up anything on the destination drive you want to keep. Macrium Reflect will then format the HDD partition (or SSD partition) for you.
4. Set the clone to run
Review your choices, then click Finish to clone your drive.
You can also clone an external drive onto your PC if you wish. To do so, follow the same process detailed above, but choose the external drive as the source drive, and your PC’s drive as the destination drive.
5. Enter UEFI/BIOS to ensure the clone has worked
You can boot your computer from the cloned drive to check that everything’s working properly. To do this, you’ll need to enter your BIOS (Basic Input/Output System) or UEFI (Unified Extensible Firmware Interface) and then tell your computer to work from the cloned drive instead of the original one. The BIOS is your computer’s firmware settings, and on newer computers BIOS has been replaced with an updated interface known as UEFI.
You can enter the BIOS/UEFI by entering Advanced Startup mode in two ways:
-
You can enter Advanced Startup mode by inputting a specific key or key combination as your computer starts up. It may be F12, F2, Esc, or Delete, but your computer should display this information on the monitor during the initial startup stages.
-
You can also enter Advanced Startup mode on Windows 10 or 11 by holding Shift while pressing the Restart button. Press Start > Power. Then, hold the Shift key and press Restart. Keep holding shift as your computer boots up, which will take you to the Advanced Startup screen.
On the Advanced Startup Screen, click Troubleshoot > Advanced Options > UEFI Firmware Settings > Restart. After your computer reboots once more, press the appropriate key from the menu to enter the BIOS/UEFI. Some computers will boot into the BIOS automatically.
In the BIOS/UEFI, look for an option that says “Boot Configuration,” “Boot Options,” “Boot Manager,” “Boot Order,” or something similar. The Boot option could be under “System Configuration,” “System Settings,” or something similar.
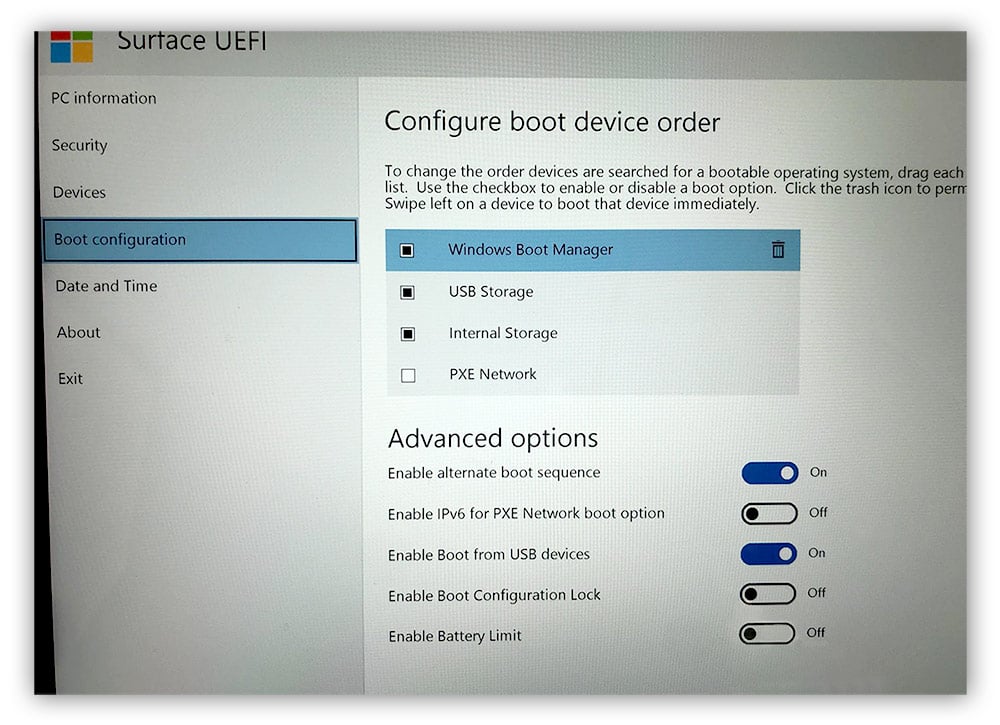
From here, you can choose the drive you want your PC to use for start-up. Select the cloned drive, shut down your PC, and restart it again normally to test it out.
How to clone your hard drive on a Mac
Your Mac’s Disk Utility app has a built-in disk duplication tool to clone a drive. When cloning hard drives on Mac, you can choose to create a duplicate hard drive image on your Mac or on an external hard drive. The process is the same whether cloning an HDD to another HDD, an HDD to an SSD, or an SSD to another SSD.
To avoid copying gigabytes of unnecessary files, broken registry items, duplicate photos, programs you no longer need, and more, you should clean your Mac before cloning. You can do it manually, but the cleaning process will be much faster, easier, and more thorough with a dedicated tool such as AVG TuneUp for Mac.
Once your drive contains only the data you want, it’s time to get started. Connect your external hard drive if necessary, then follow the steps below to clone a Mac hard drive. The steps are for macOS Sonoma. Note that Disk Utility refers to cloning as “restoring” a drive, but it’s the same thing.
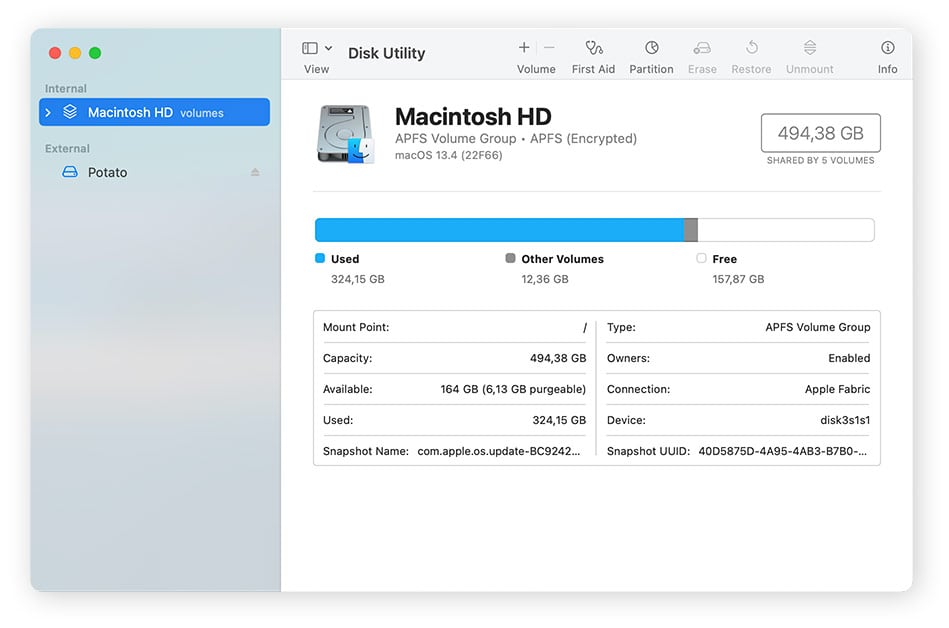
1. Run Disk Utility
In Finder, select Go > Utilities, then double-click Disk Utility. Alternatively, open Launchpad from the Dock, type Disk Utility, and click the Disk Utility icon.
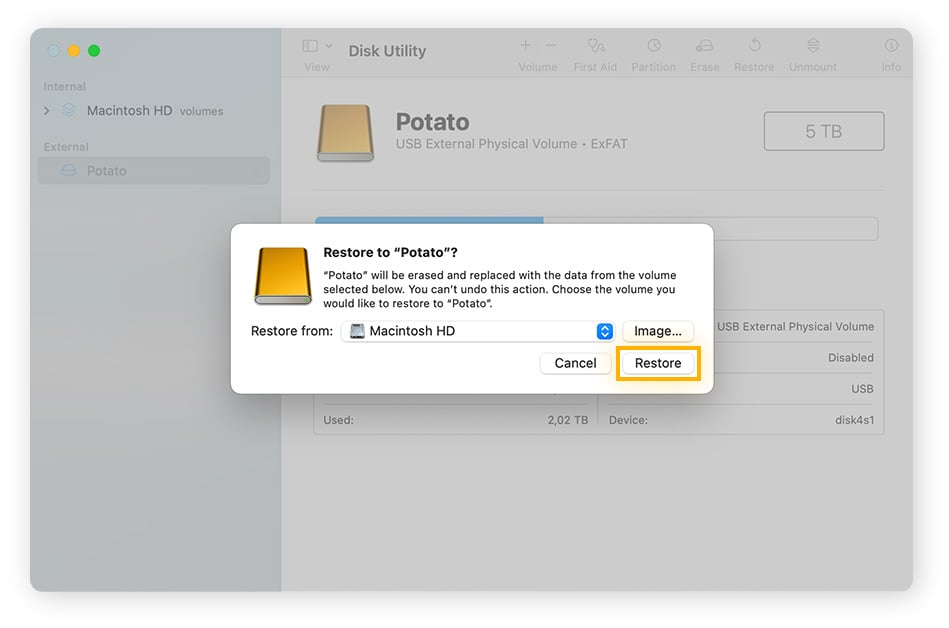
2. Select your destination drive and hit Restore
In Disk Utility, select your external hard drive in the sidebar and click Restore. Then, click the Restore pop-up menu, choose the disk drive you want to copy, and click Restore again.
You don’t have to copy your hard drive to another hard drive. You can also create an image on the same drive by choosing File > New Image, then choosing Image from (device name). Then enter a filename and choose where to save it.
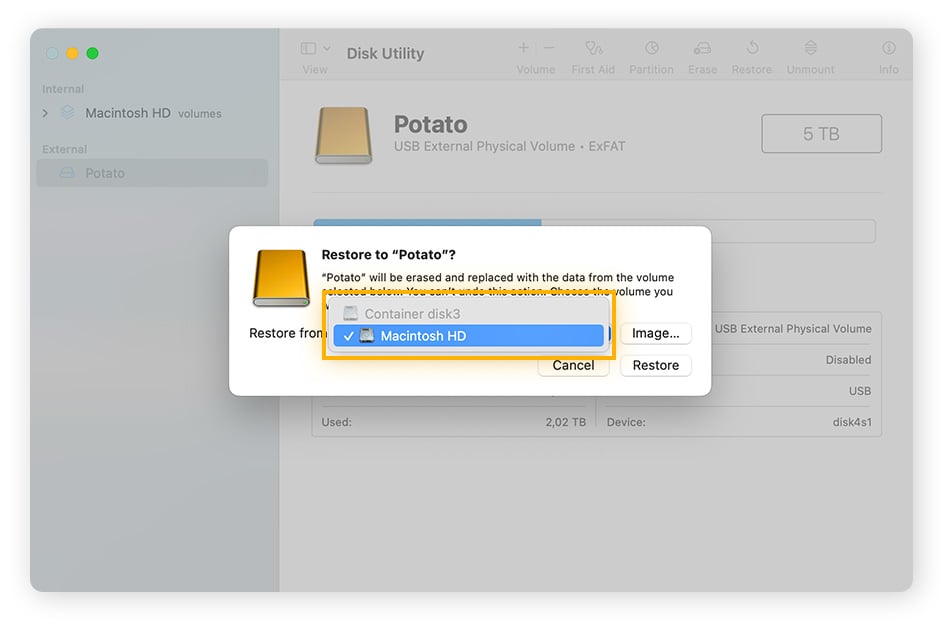
3. Select your source drive from the drop-down menu
Click the Restore pop-up menu, and choose the disk drive you want to copy. Click Restore.
This will erase everything on your destination drive. In most cases, you’ll have just one drive on your Mac to choose from.
4. Wait for the clone to take place before hitting “Done” when prompted
Wait until disk duplication is complete by monitoring the status bar, and then click Done to complete the operation.
5. Boot up the new drive to ensure the clone has worked
To boot up from a cloned drive on a Mac, you first have to load the startup options and change the startup disk.
-
On a Mac with an Apple silicon chip (e.g., M1), turn off your computer, then press and hold the Power button until you see Loading startup options.
-
On a Mac with an Intel chip, turn off your computer, then press and hold the Option key as you press the power button to start up your Mac.
-
On a Mac mini, wait for the light to turn amber.
Select the cloned drive from the available startup disks, then click Continue on a Mac with Apple Silicon, or the up arrow on a Mac with Intel. The next time you restart your Mac, it will boot up from the disk you selected. You can test if your cloned drive works properly by booting your computer from it.
What is disk cloning used for?
Disk cloning is used primarily for data backup and recovery. When a hard drive is in danger of failing, cloning the hard drive transfers all the data to a healthy source. Disk cloning is also used when upgrading an HDD (hard disk drive) to an SSD (solid-state drive).
Cloning a hard disk to SSD
When cloning a hard drive to an SSD, you get increased speed, durability, and security for your data. SSDs boot and load faster, while also being lighter and using less energy. The biggest downside to SSDs is the cost involved, as it’s newer tech.
The process for how to clone a hard drive to an SSD is identical to cloning an HDD to another HDD. SSD clone software and HDD clone software are the same, so you don’t need specific software to clone a hard drive to an SSD.
If you’re having issues with Windows 10, you can clone Windows 10 to an SSD to see if the situation improves. People often clone their HDD to an SSD with Windows 10 or 11 when they are having performance issues.
Why you should consider cloning your hard drive
You should consider cloning your hard drive to have a backup, to transfer data to a new machine, or if you just want to upgrade your HDD to an SSD. People also often clone their HDD to an SSD for Windows 10 or 11 performance issues.
Instead of having to figure out how to migrate your OS to a new hard drive, you can just clone the drive with the operating system copy intact. Malware such as ransomware can hijack your OS at any time, so cloning the hard drive gives you a failsafe. If you clone your hard drive it will work on another computer too, so cloning your drive is a simple way to make the switch if you’re disposing of an old device.
If you copy your HDD to an SSD, you may also speed up your computer. Solid-state drives are more efficient and quick, and less prone to fail. If you’re a gamer, cloning Windows 10 to an SSD offers faster response with less load time, but any OS will be more speedy on an SSD. If you clone your hard drive it will work on another computer.
How to prepare for duplicating your drive
When preparing to clone a drive, there are a few key things you need to do first to get ready to make the switch smoothly and seamlessly:
-
Choose your new drive. If changing HDDs, make sure the HDD comes from a reputable brand. If you clone an HDD to an SSD, make sure the SSD has enough space. HDDs have a ton of storage capacity, so your SSD might not fit it all if it’s too small.
-
Select a third-party cloning utility. Choose a trusted third-party program for duplicating Windows hard drives. Macrium Reflect and EaseUS have intuitive and robust features in their free trials. Clonezilla is also a good free tool for more advanced users, and Disk Genius offers simple clone software that’s easy to use.
-
Format the new drive. Before you can copy one hard drive to another, the destination drive has to be formatted. On Windows, you can do this manually by going to Control Panel > System and Security > Administrative Tools, and double-clicking Computer Management. Under Storage, choose Disk Management, then right-click the HDD partition you want to format and select Format.
-
Back up your old drive. Back up the drive in your hard drive cloning software of choice. You can back up your drive as an image on the HDD internally, or externally to another physical drive.
How long does cloning a hard drive take?
It usually takes anywhere from 10 minutes to an hour to clone a hard drive, depending on the speed and health of the source and destination drives, and the amount of data being transferred. The speed of hard drive cloning software also differs.
The hard drive cloning process will take a bit longer when you clone an HDD to an SSD than an SSD to an SSD. How long it takes to clone a 500 GB drive depends on the speed of the source drive, but at 100MB/s it should take about an hour.
NVMe (nonvolatile memory express) SSD drives offer the fastest transfer speeds, but you’ll want to pair it with reliable NVMe-compatible cloning software like Macrium Reflect to be sure data doesn’t get corrupted in the process.
Give your new hard drive the care it needs
To help make sure your new hard drive transfers seamlessly and runs smoothly in the long term, it’s important to keep it as clean and light as possible.
AVG TuneUp automatically manages your drive to remove unnecessary bloatware and temporary data, so you don’t get bogged down with unwanted junk. And it even boosts computer performance by snoozing inactive programs and background processes that slow you down. Enjoy optimal performance and speed for years to come.