How to clear your search history
You can clear your search history across all your devices in the settings of your Google, Bing, or Yahoo accounts. Sign in to your account, go to settings, and access your search history. From there, you can view and delete any activity you choose.
Just by landing on this page, you’ve added one more website to your browser history. And if you got here via a search engine, that’s another item in your search history as well. Clearing your browsing and search histories is important, because those bread crumbs can quickly pile up.
While deleting your browser history will clear some searches, it will clear only the searches you made in that one browser on that particular computer. And it doesn’t prevent advertisers from following your search history and using it for ad tracking.
Here’s how to delete your search history in Google, Bing, and Yahoo:
Delete your Google search history
-
Sign in.
Log in to your Google account.
-
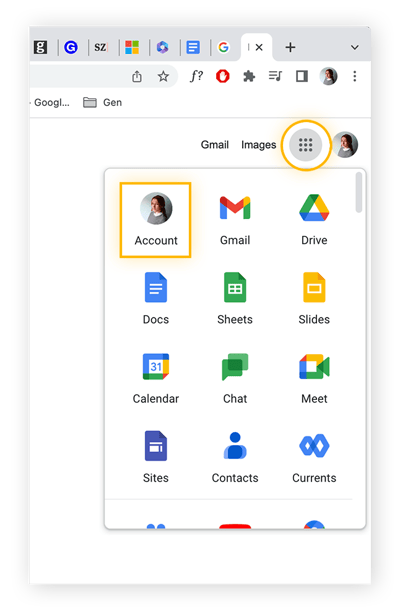
Open your account settings.
Click the App menu in the right corner and choose Account.
-
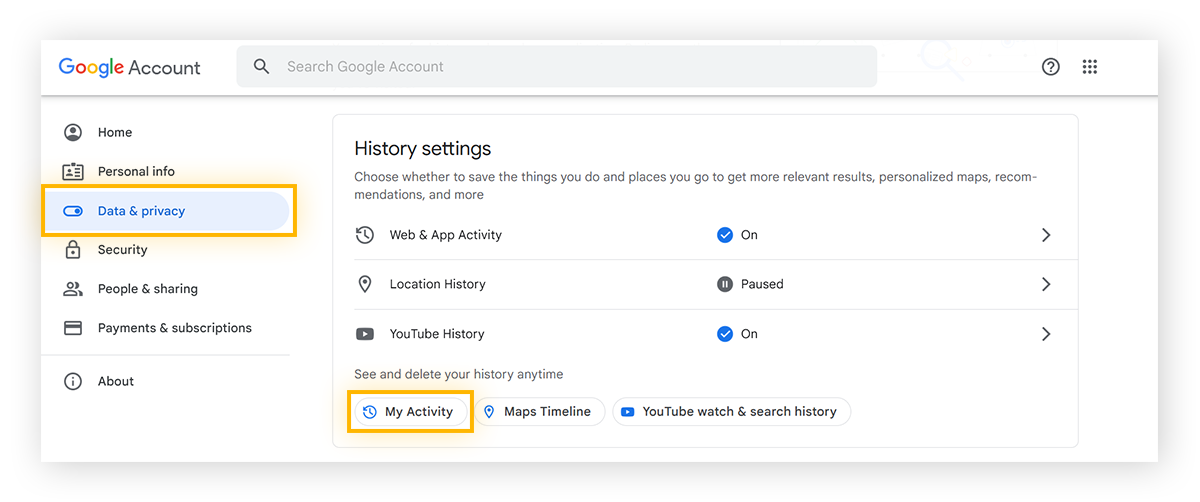
View your account activity.
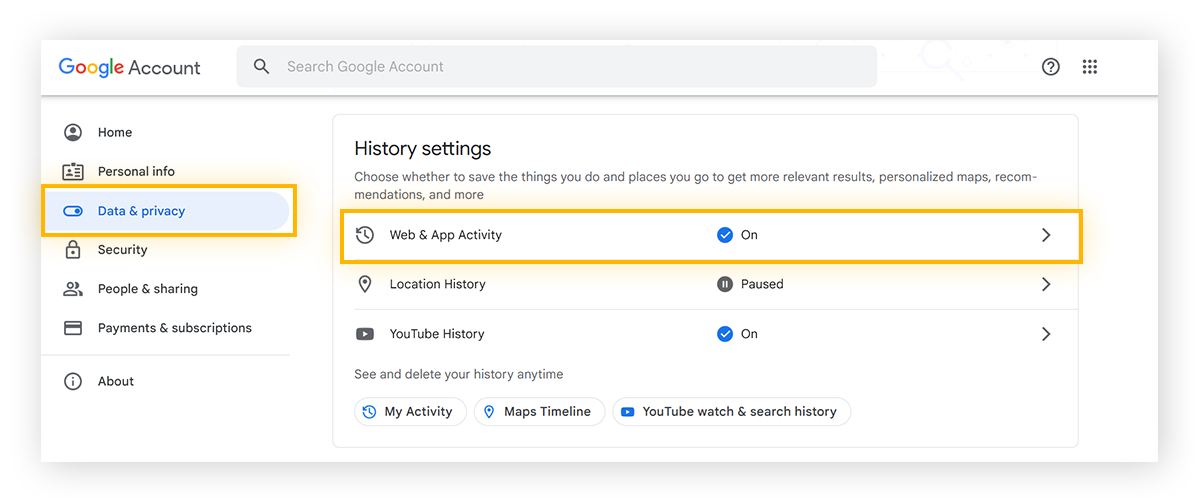
Click Data & privacy and scroll down until you see a box labeled History settings. Click My Activity.
-
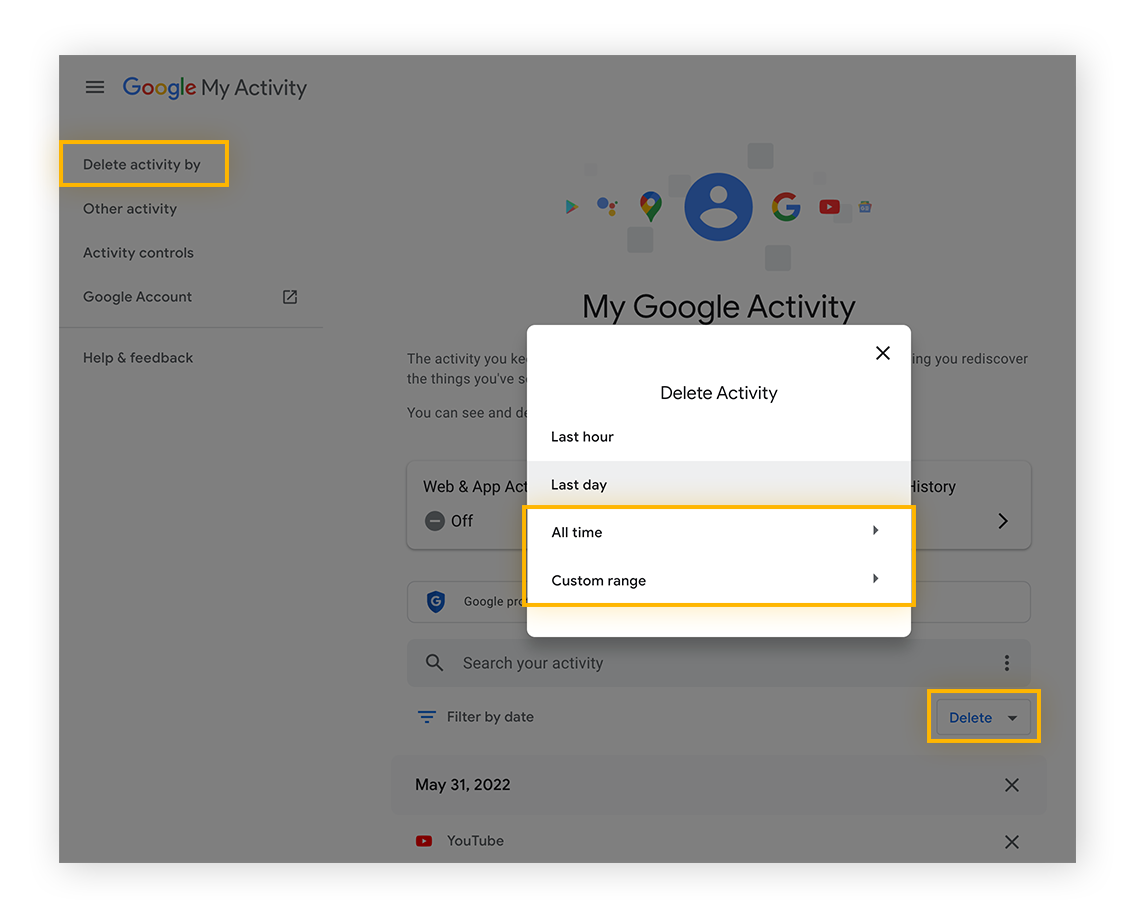
Delete unwanted searches.
You’ll see a list of many links and websites. From here, you can remove any site or history from a particular day by clicking the X icon next to the item or date.

-
Delete your entire history.
Delete your entire history by clicking the Delete button under the activity search bar. In the pop-up that appears, choose All time or select a Custom range.
-
Confirm the deletion.
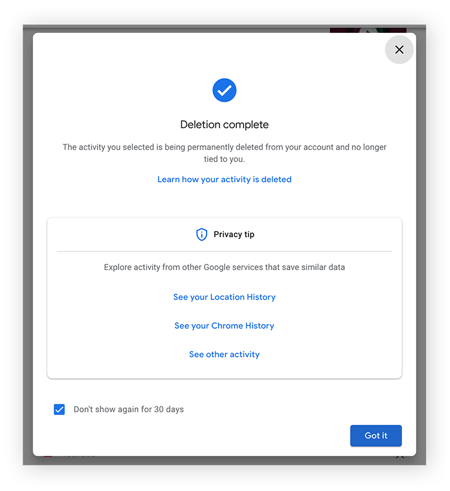
Click Delete to confirm you want to erase your history. The next screen will confirm that you’ve deleted your search history, while offering additional options for managing your activity and history.
-
Adjust your search history settings.
Go back to Data & privacy and find the History settings. Click the activity you want Google to stop tracking, like Web & App Activity.
-
Turn off search history collection.
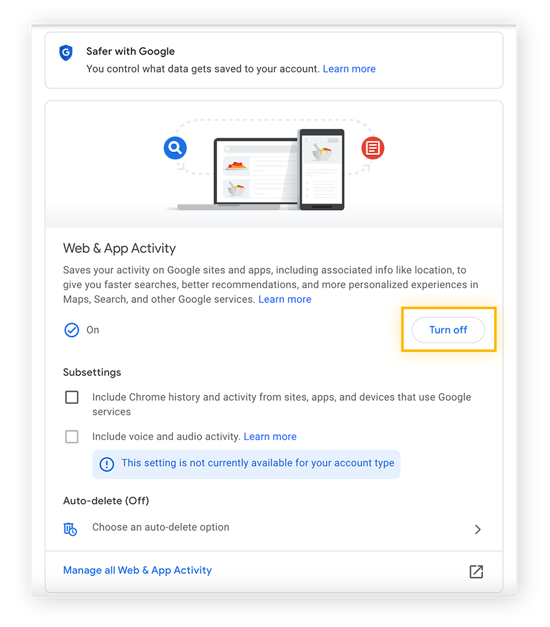
Inside Activity controls for Web & App Activity, click Turn Off to prevent Google from saving your search history.
And that’s how to clear your Google search history. Google knows a lot about you beyond just your search history. Download your Google data if you’re curious.
Wipe your Bing search history
Here’s how to delete your Bing search history:
-
Sign in to your Microsoft account.
-
Click the three bars next to your login and click Search history.
-
Click View and delete search history and go to a new site.
-
Log in again.
-
After logging in, you’ll be taken to a new page. Click View and Clear Search History.
-
Click Search on the left menu.
-
You can delete each item individually, or you can click the Clear activity button in the upper-right.
-
Click Clear on the pop-up to clear your Bing search history.
That’s how you delete all searches in Bing. But you’ll have to use InPrivate windows in Edge to prevent Microsoft from saving your searches going forward. Private browsing modes are just one way you can stay safer while browsing — and you may not need to delete your Bing search history again.
Clear your Yahoo! search history
Clearing all your searches in Yahoo is easy. Log in, open your settings, and delete your searches.
-
Log in to Yahoo.
-
From the Yahoo search page, click the box in the upper-right corner, and click Settings.
-
On the far left, click Search History.
-
Click the garbage bin next to each item you want to delete.
-
To clear your entire search history, click Clear History, then click Delete in the pop-up.
-
Click Turn History Off to prevent Yahoo from saving your search history in the future.
How to clear your browsing history
Deleting your browser history from one major browser to the next is largely the same. While you can choose how much of your history to delete, pick the all time/everything option if you want to completely refresh your browser.
Here’s how to delete your history in several of the most popular browsers.
Delete your Google Chrome browsing history
Note that this is the process for how to delete search history on Google Chrome — not from your Google Account.
-
Open Chrome.
-
Click the three dots in the upper-right corner.
-
Click History. On the expanded menu, hit History again.
-
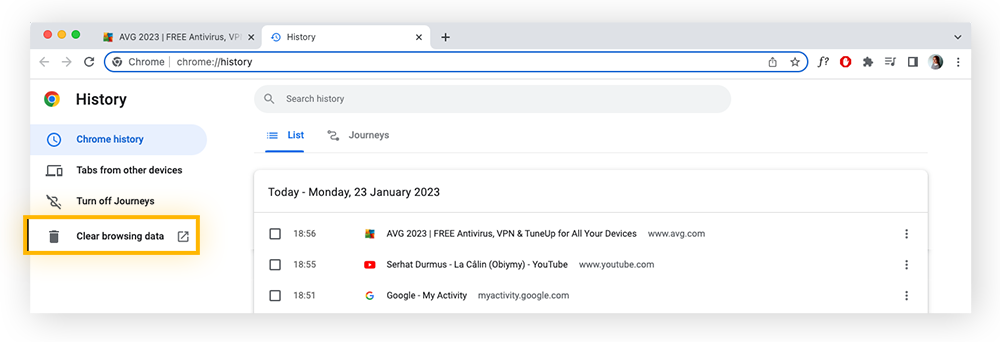
Select Clear browsing data on the left panel of the new tab that opens.
-
Another new tab will open with a pop-up. Keep the box next to Browsing history checked and select how much of your history to delete.
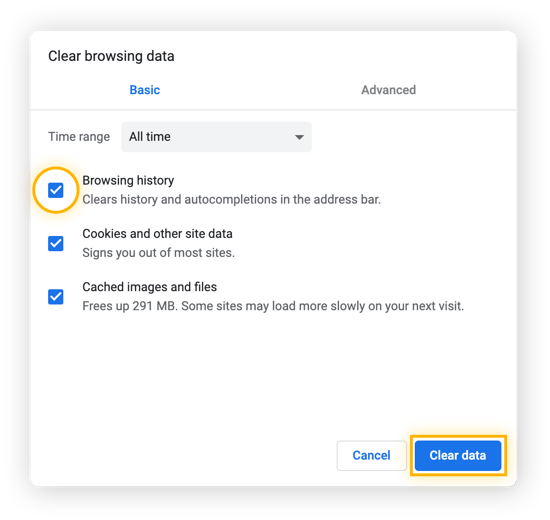
-
Click Clear data.
Get more control over your browsing experience by blocking pop-ups in Chrome and removing Chrome extensions if they’re no longer helpful.
Wipe your Firefox browsing history
-
Open Firefox.
-
In the menu bar, click History.
-
Click Clear Recent History.

-
Check both Browsing & Download History and Form & Search History. Then use the drop-down menu at the top to choose the length of time.
-
Click OK.
Clear your Internet Explorer & Microsoft Edge browsing history
If you’re still using Internet Explorer, consider switching to a new browser. Microsoft no longer supports IE with security updates, which leaves it vulnerable to security holes that can be exploited by hackers.
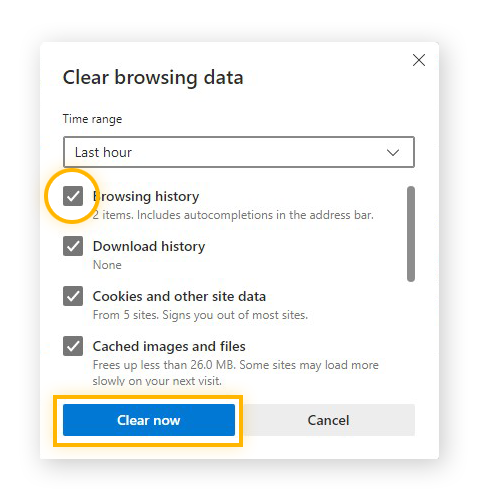
Here’s how to delete your browsing history on Microsoft Edge:
-
Open Microsoft Edge and click the three dots on the right side of the web address field.
-
Click History (next to the clock-arrow icon).
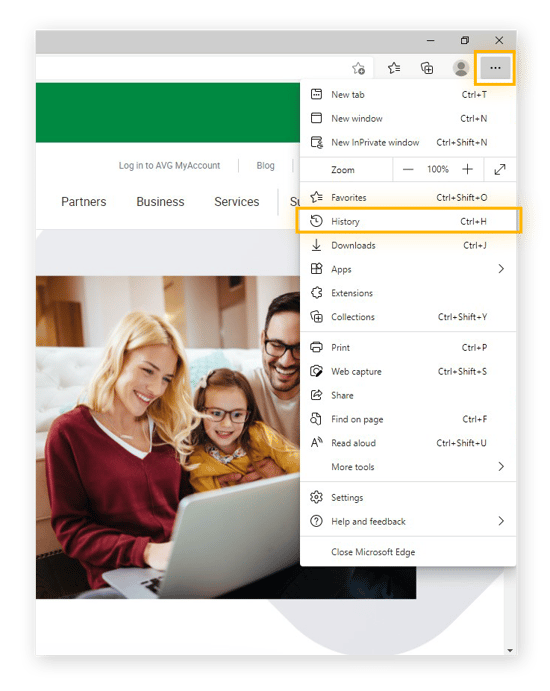
-
Select Clear browsing data at the top.

-
Keep the box for Browsing history checked, then click Clear now.
Delete your Opera browsing history
-
Open up Opera.
-
Click the clock on the far-left toolbar.
-
For individual pages, just hover over the link and click the X icon on the right.
-
To clear everything at once, click Clear browsing data.
-
A new window should pop up. Make sure the box next to Browsing history is ticked, and set the time range.
-
Click Clear data and you're done.
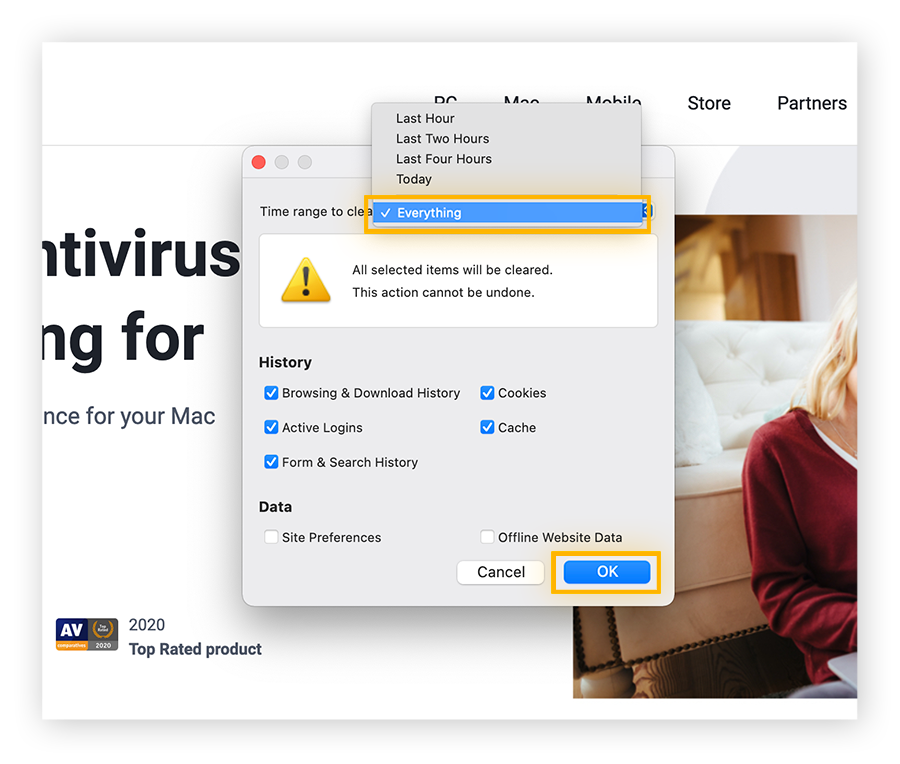
Wipe your AVG Secure Browser history
AVG Secure Browser was designed with privacy at the forefront. With robust security and privacy features, you can bank, shop, and surf safely. Use its private mode — which automatically blocks ads, trackers, and phishing attacks — and you won’t have to worry about clearing your browser history at all.
If you aren’t using private mode, you can still clear your AVG Secure Browser history in a few easy steps:
-
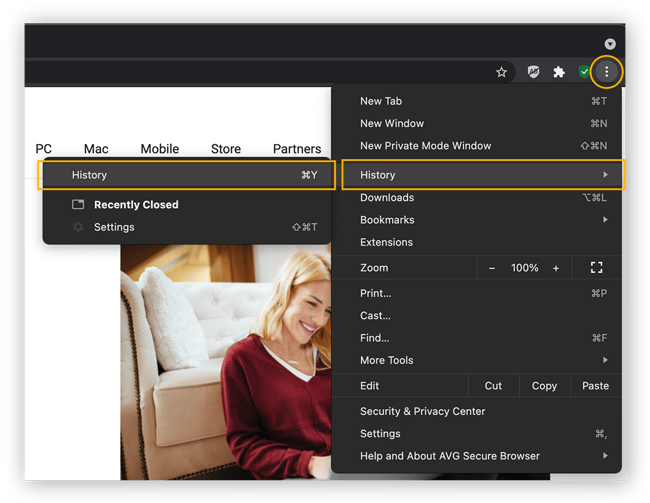
Open AVG Secure Browser.
-
Click the three dots in the right corner, then navigate to History > History.
-
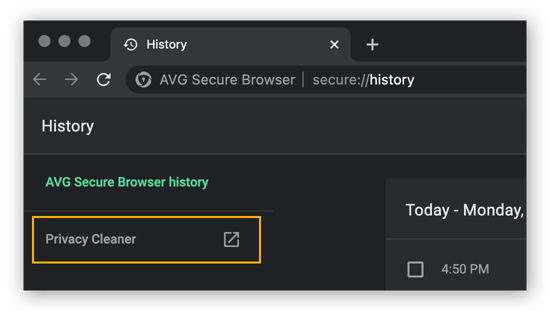
Click Privacy Cleaner.
-
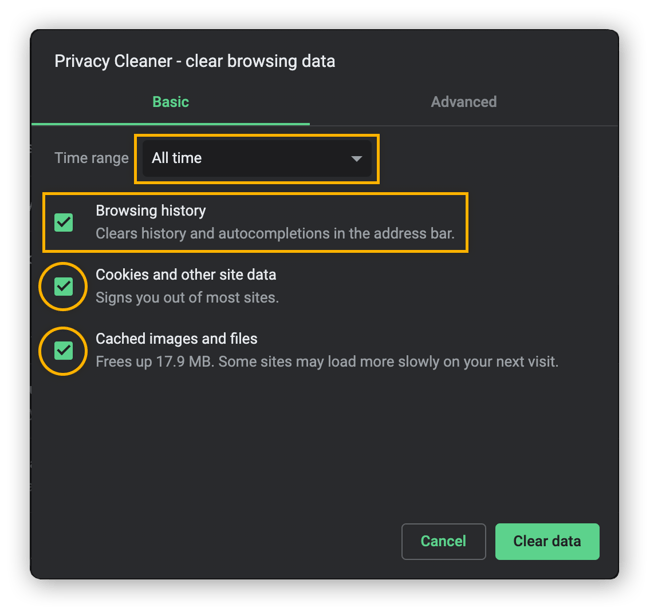
Select everything you want to delete (browsing history, cookies, cache) and choose your timeframe from the drop-down menu. Then click Clear data.
While you’re in Settings, click Privacy & Security Center to see all the safety-enhancing features AVG Secure Browser has to offer.
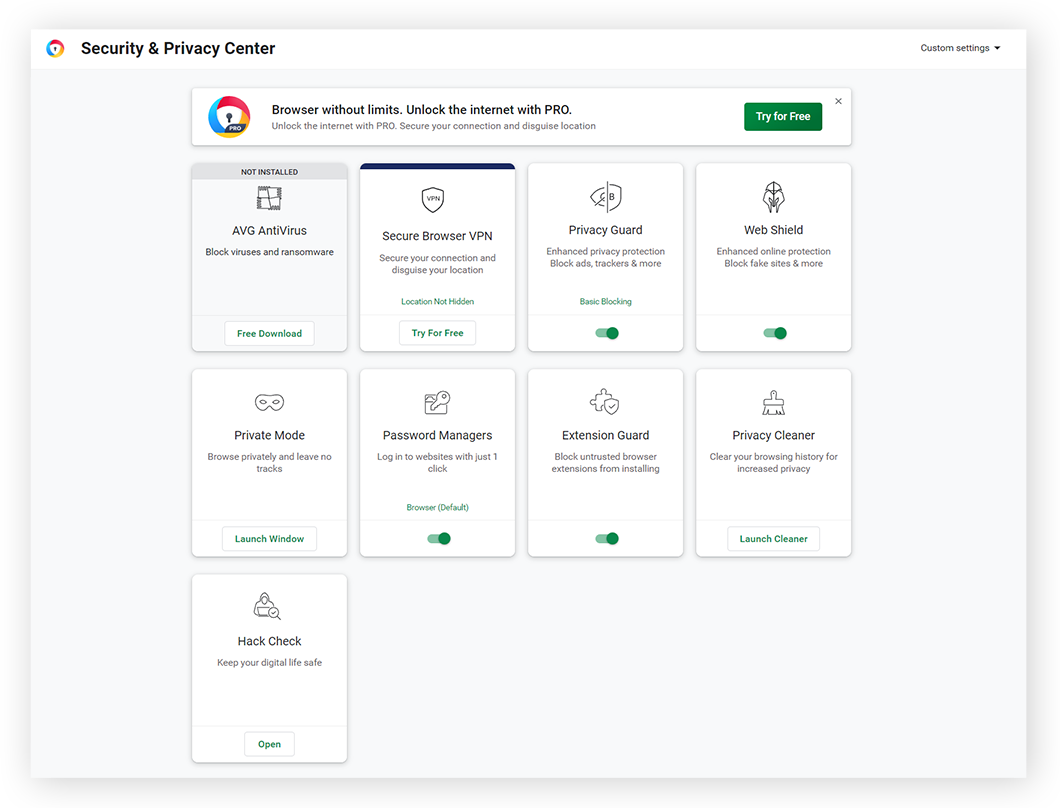 AVG Secure Browser blocks ads, trackers, malicious extensions, and more.
How to clear your browsing and search history on mobile
Clearing your search history on your Google, Bing, or Yahoo! accounts deletes it on your mobile devices, too. But you may need to clear your browsing history on mobile separately.
Here’s how to clear your history on mobile devices:
How to clear search history on iPhones and iPads
If you’re using Safari, you’ll clear your iPhone or iPad’s browsing and search history at the same time. Clearing them separately is only possible with other browsers.
To delete Safari history on iOS devices, you can either go into Settings or do it from within the Safari app itself.
To clear Safari history through Settings, tap Settings, scroll down to Safari and tap it, and scroll down until you see this screen:
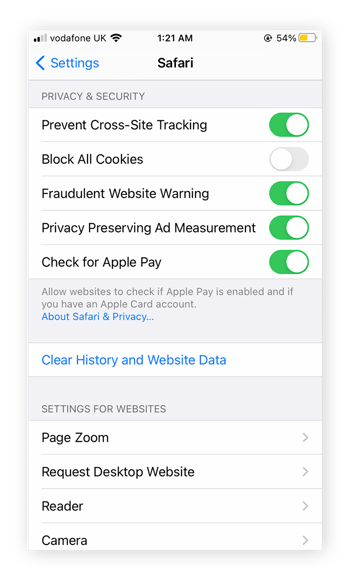
Then tap Clear History and Website Data. And that’s how to clear Safari history from Settings.
Here’s how to delete both your browsing and search history on iOS from within the Safari app itself:
-
Launch the Safari app.
-
Tap the open book icon on the bottom toolbar.
-
Then tap the clock in the upper right.
-
Delete individual items by clicking X to the right of each link.
-
Clear everything, including cookies, by tapping the Clear button at the bottom of the list.
-
Select how far back you want to delete and you’re good to go.
While you’re learning how to clear search history in Safari, you can further streamline your Safari experience by blocking Safari pop-ups.
Delete browsing and search history on Android phones and tablets
Deleting your browsing history on Android devices is a lot like the process on PCs, meaning it changes depending on the browser you’re using. If you’ve already cleared your search history on your desktop browser, you don’t need to do it again on your phone.
Here’s how to clear your search history on mobile in various browsers:
Google Chrome
-
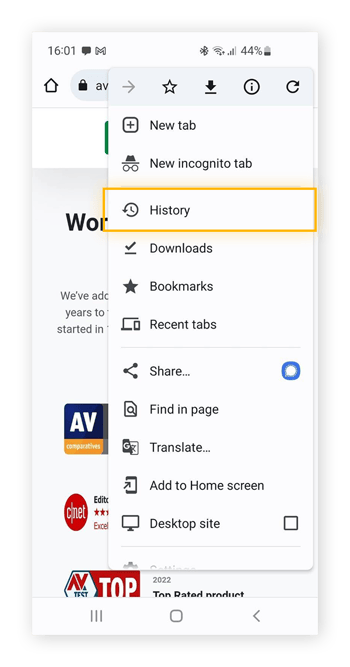
Open the Google Chrome app on your Android, tap the three dots in the right corner, and select History.
-
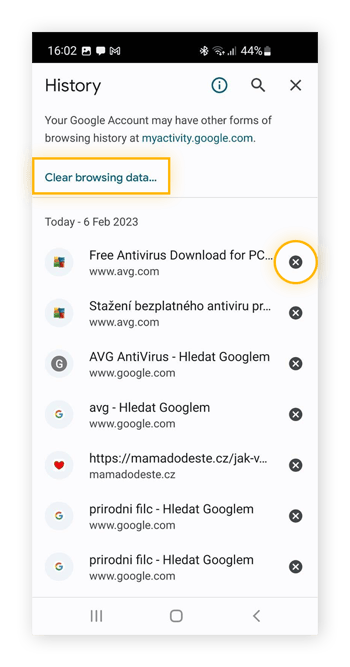
You can either delete individual items from this list with the X buttons next to each link, or click Clear browsing data at the top to do everything at once.
-
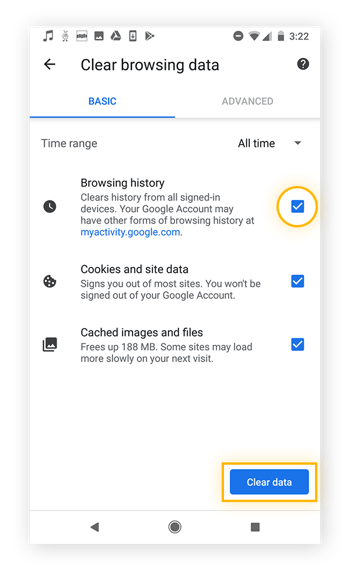
Make sure Browsing history has a checkmark next to it. Choose how much history you want to delete with the drop-down menu to the right.
-
Click Clear data and you’re done.
Of course, your search and browsing history will start to build up again quickly. Consider automating the process to easily delete your browsing history, cookies, cache, and more regularly with an automated browser cleaner tool.
Firefox
-
Open the Firefox mobile app.
-
Tap the three dots in the right corner.
-
Select History.

-
You’ll see a list of recently viewed websites. Tap Delete history at the top of the screen.

-
Tap Delete on the pop-up that appears.

Opera
-
Launch Opera.
-
Find the O-menu button on the bottom right and tap it.
-
Tap History, then tap the trash icon on the upper right.
-
Confirm you want to clear your browsing history.
Clear your Google Play search history
-
Open up Google Play.
-
To the right of the search bar, tap the blue circle with your initial or profile picture. Tap Settings.
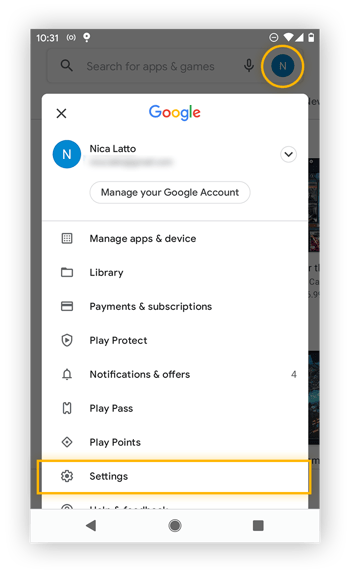
-
Click the arrow to the right of General to expand the menu. Then tap Account and device preferences.
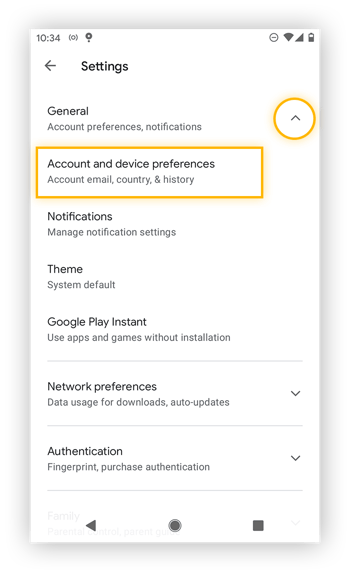
-
Scroll down and tap Clear device search history.
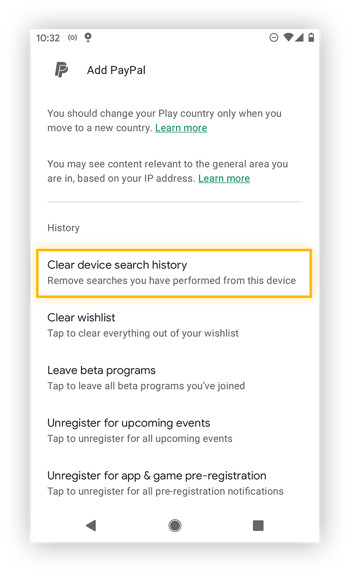
-
Confirm by tapping Clear history.

How to delete your YouTube search and watch history
To block Google’s ability to track your YouTube history, log in to your Google account and go to Privacy & personalization > Activity controls. Turn YouTube Search History and YouTube Watch History off.
YouTube uses your search and watch history to show videos you might be interested in, but you should delete your YouTube history if you want to stop Google from collecting and storing this information. You may also want to delete YouTube search history for some privacy in your home.
If you don’t want to look up how to delete your YouTube search history again, start browsing in Incognito Mode from now on. If you’ve watched any videos in your browser's incognito/private mode, they won’t be saved.
If you deleted your Google search history as described above, then you may have also seen an option to delete your YouTube watch and search history there. Read on to find out how to delete your YouTube history by other methods.
To get rid of your YouTube search and watch history, follow any one of the following three processes. They’ll each clear your YouTube search and watch history on every device you use.
How to clear YouTube search history on the YouTube website
Here’s how to clear your YouTube watch history on the YouTube website:
-
Log into your YouTube account.
-
Click the three bars in the corner and go to History.
-
Delete individual videos by hovering over the title with your mouse and clicking the X button on the right.
-
To delete everything, click Clear All Watch History on the right, then confirm a second time on the pop-up.
-
Pause your watch history in the same menu.
-
Click Watch and search history on the right.
-
Delete individual search items or everything at once.
How to clear your YouTube history on the YouTube mobile site
Here’s how to clear YouTube history on your phone:
-
Open the YouTube website on your phone and log in.
-
In the upper menu, tap the icon to access your account.
-
Tap History.
-
To delete individual videos in your history, tap the three dots next to each one, then tap Remove from Watch history.
-
To delete everything or pause your watch history, tap the buttons on the top: Clear All Watch History or Pause Watch History.
-
Confirm your choice in the pop-up that appears.
-
Tap the Search History tab to delete individual items or your entire search history.
How to clear your YouTube history in the YouTube app
You can also clear YouTube history via the YouTube app:
-
Open the YouTube app and make sure you’re logged in.
-
Tap Library at the bottom of the screen.
-
Tap History.
-
Tap the three dots next to an item and click Remove from Watch history to delete individual videos.
-
To delete everything, tap the three dots in the upper-right corner of the screen, then tap History controls.
-
Tap Pause watch history and Pause search history and confirm.
-
Tap Clear watch history and Clear search history as well and confirm.
Why clear my browsing and search history?
Storing your browsing history can take up memory on your device and slow it down. And if you ever intend on sharing your device, clearing your web history is a good first step in keeping your activity private.
Clearing your browser makes it safer as it protects against history sniffing, which can put your personal info at risk. Plus, cleaning up other temporary files can speed up your PC. Several of the most secure and private browsers will automatically clean your history at the end of each browsing session.
Why bother clearing your search history? All the big search providers track your searches, which they then use to help advertisers reach you more effectively. Other sites may sell your data directly to advertisers or data brokers, which could open you up to malvertising attacks. Given how often data breaches happen, you’re one leak away from potential trouble.
Is there any reason not to delete my browser history?
Deleting your browser history prevents your browser from auto-filling the URLs of your favorite sites, but you can easily make up for that by using bookmarks. If you’re worried about your stored passwords disappearing if you delete your history, they’ll be preserved — but a password manager is a much more secure way to store your passwords.
If you’re not sure exactly what to keep or delete, and if you want to give your PC a general cleaning, try AVG TuneUp. Our specialized cleaner will streamline your browser and remove redundant files and other junk to boost your computer’s performance and speed.
A word on cache and cookies
There are differences between a browser’s history, cache, and cookies — though they’re certainly linked and will often show up in the process of cleaning out your history.
-
The cache saves elements that certain websites need to run. When you visit those websites again, the cached data helps your browser load faster.
-
Cookies are used by websites to track data about you: what you do, what you’re authorized to see, and where you go next.
Not all cookies are bad, but you should regularly delete browser cookies and clear the cache too. It’ll keep your browser running its best, and keep your data that much more private.
Private/incognito mode
Your browser's private or incognito mode prevents your browsing and search history from being saved locally on your device. But private browsing doesn’t make you invisible online, and it doesn’t stop advertisers from tracking you. Private browsing keeps any browsing activity out of your device’s browsing history.
For greater protection and anonymity online, switch to a dedicated private browser like AVG Secure Browser, which includes anti-tracking, automatic ad blocking, malware protection, and much more.
Delete your browsing and search history the easy way
To skip all the trouble of manually deleting your search and browsing history, get an automated browser maintenance tool. AVG TuneUp is a powerful performance optimizer that will automatically clear out junk — including your browsing and search history — to protect your privacy and keep your PC in tip-top shape, 24/7.
FAQs
Why can't I clear my search history?
If you’re wondering why you can’t delete your history on Google Chrome, or find that you can't delete your iPhone search history, it’s most likely because you aren’t logged into your account. You may also need to configure Google Chrome to stop syncing activity with your Google Account, or you may to delete extensions or add-ons which are blocking access. Alternatively, you may be unable to clear history because of a parental lock restriction.
How do I see my browsing history?
You can view your browsing history for any PC browser by typing Ctrl + H. For Safari on Mac, use the ⌘ Command + Y. On Safari on an iPhone, hold your finger down on the < button in the lower-left. For Google Chrome on Android, tap More in the top-right, then tap History, and swipe up to see a list of recent search entries.
Why can't I see my recent searches on Google?
Your search history is only saved when you’re logged in to your Google account, so if you’re not currently signed in, your recent searches will not be visible. Likewise, even when you are signed in, you won’t be able to see any recent searches made while you weren’t. Alternatively, you may have configured your Google settings not to save your search history at all.
Why is my YouTube history paused?
If your YouTube watch history is not updating, you may have accidentally paused it. To check, go to the YouTube website, click the hamburger menu in the upper-left, and click History. If you see “Pause watch history” on the right-hand menu, that means your watch history is enabled. If you see “Turn on watch history,” your history is currently paused — click it to turn YouTube History back on.
Does clearing history delete everything?
A lot of data is generated as you browse the internet, and clearing your history only deletes the record of addresses you’ve visited that are stored locally on your device. It doesn’t remove your Google search history, or other data stored on remote servers. It also doesn’t delete cache data, or disable cookies.
How do I clear cookies on an iPhone?
To clear cookies on your iPhone, open Settings, tap Safari, then scroll down and tap Advanced followed by Website Data. Finally, tap Remove All Website Data.
This will help improve your iPhone’s performance and prevent Safari pop-ups and other targeted ads from bothering you. You can strengthen your privacy further by following iPhone security best practices and using a top-rated iOS security app.
How can I clear history on Chrome?
To delete search history on Google Chrome, click or tap the three dots in the top-right corner of the browser window, navigate to History via the drop-down menu, and select Clear Browsing History followed by Clear Data to confirm.
You can also use a browser cleaner tool such as AVG TuneUp to manage your browsing history and other data used by Google to track you online. Chrome security extensions that block pop-ups are another way to protect your privacy.
What happens when you delete cookies?
Deleting browser cookies permanently wipes all cookie data. That means that you’ll lose data in your shopping carts and any login information you’ve entered into websites you visit frequently. But it also means that you’ll be served fewer targeted ads.
Cookies improve your browsing experience by saving data so you don’t need to constantly re-enter it. But cookies also let websites and advertisers track your online activity, so deleting them will enhance your online privacy.
What does deleting browsing history do?
Deleting browsing history clears the list of previously visited websites from your browser, and it prevents the browser from auto-filling the URLs of your favorite sites. Deleting history does not affect cookies, saved login credentials and passwords, or other private information stored as cached data.
However, it makes your browser safer by clearing out the cache, which can host viruses and malware. That’s why performing a full browser cleanup improves your security and data privacy.
Can deleted history still be viewed?
Even after you delete your browsing history, your search history can still be viewed if you were signed into your Google account and had search history collection enabled. Other fragments of your browsing history can also be found in your downloads history, browser cache, and other locations. That’s why you should use a specialized cleaner tool to wipe away all your digital breadcrumbs. Learn more about clearing your cache on Android and deleting cached data on Mac.
%20-%20refresh/Signal-How-to-clear-your-browsing-and-search-history-Hero-refresh.jpg?width=1200&name=Signal-How-to-clear-your-browsing-and-search-history-Hero-refresh.jpg)