How to screen record on Mac
Here’s how to screen record on Mac (macOS Catalina 10.15 or newer):
-
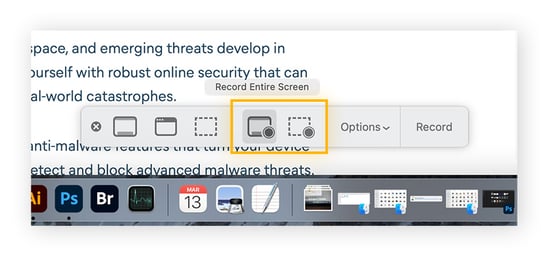
Press ⌘ (Command) + Shift + 5 simultaneously to open the Screenshot toolbar.
-
Select either Record Entire Screen (the fourth icon), or Record Selected Portion (the fifth icon) on the Screenshot toolbar. You can hover over the icons to see what they do.
-
If you want to record a specific portion of your screen, select Record Selected Portion (the fifth icon) and highlight the area you want to record.
-
Click Record.
Your entire Mac screen, or the portion of your Mac you highlighted, will now record video. Click the stop icon in the menu bar to end the screen recording. You can also press ⌘ (Command) + Control + Escape to end screen recording on Mac, or hit Escape to cancel your Mac screen recording before it starts.
Below, we’ll also show you how to record your screen with audio on Mac.
How to record screen with audio on Mac
By default, Macs record without sound, but they do have an option for screen recording with audio.
Here’s how to record your screen and audio at the same time on Mac:
-
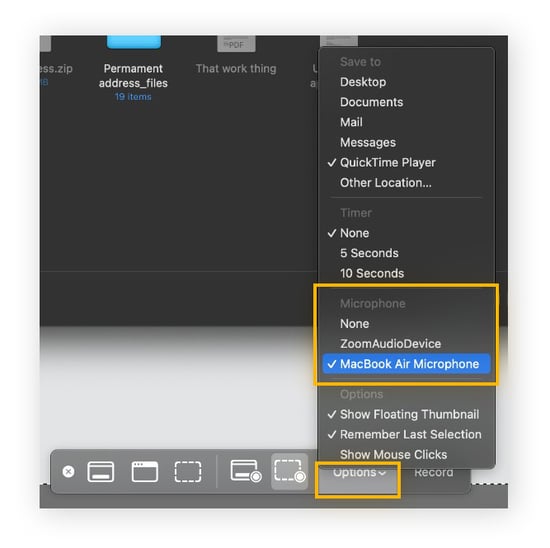
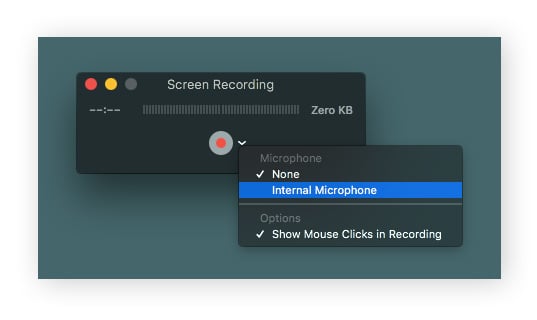
Open the Screenshot Toolbar (Cmd + Shift + 5) or open QuickTime Player > File > New Screen Recording.
-
Click Options, then select your preferred microphone for the audio recording.
-
Choose either Record Entire Screen or Record Selected Portion.
-
Click Record.
Your Mac screen will now record, with audio from the microphone you selected. You can also attach an external microphone, such as a USB mic or an iPhone, to record your Mac screen with audio from those devices.
When screen recording for strangers, be careful not to reveal any personally identifying information. Follow our Mac security guide to keep all your sensitive info safer.
Choose a recording method
Mac's built-in QuickTime Player lets you trim and save your screen recording in different resolutions, while third-party methods let you record internal audio, record specific applications, and edit your video more extensively.
Built-in screen recording features on Mac
QuickTime Player comes pre-installed on Macs, and it has a screen recording feature.
Here’s how to record your screen on Mac with QuickTime Player:
-
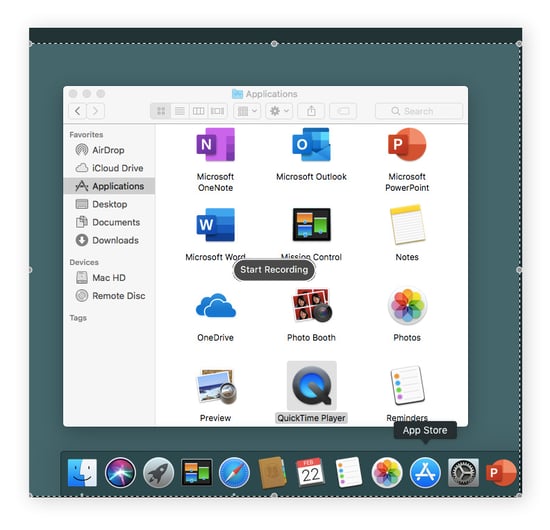
Open QuickTime Player, click File in the menu bar, and choose New Screen Recording.
-
Click Record to set up the recording. Select the down arrow next to the Record button to choose a microphone for audio.
-
Click to select the entire screen. Drag to select part of the screen.
-
Click Start Recording.
End your recording by clicking the Stop button in the menu bar.
Third-party software for screen recording
Apple can't officially permit screen recording on a Mac with internal audio or the recording of specific applications due to copyright issues. But third-party apps have figured out how to screen record on Mac with internal audio for more professional purposes.
These are some of the best third-party methods for screen recording on Mac with sound:
-
OBS Studio is free and open-source, and it can record from internal audio on macOS Ventura or newer. OBS Studio can also record from specific applications or windows. The downsides of OBS Studio are a steep learning curve, demanding system requirements, and a lack of editing features.
-
Camtasia can record internal system audio and mix and match recordings from specific windows, applications, and devices. Camtasia is a bit pricey, but it has powerful editing capabilities.
-
VMaker has an intuitive interface and can screen record with internal audio. VMaker also has a “Record a window” option to screen record a specific application or window, and it has helpful editing features. Vmaker runs on an affordable subscription model, but it can record short videos for free.
-
RogueAmoeba’s Loopback creates a virtual device to merge audio from any source you choose. You can record internal audio from any device or application, such as Zoom, Safari, or your iPhone. After setting it up, Loopback will appear in Mac’s Screenshot toolbar and QuickTime Player as an audio option.
Microphones are fine if you only want to know how to screen record on a Mac with voiceover, such as for explainer videos or work presentations. But internal system audio is needed to capture the original audio from games, videos, or other sources.
How to edit and save screen recordings
QuickTime Player does not offer robust editing tools like third-party options do, but you can still trim and save your screen recordings through QuickTime.
Here’s how to edit and save screen recordings in QuickTime Player:
-
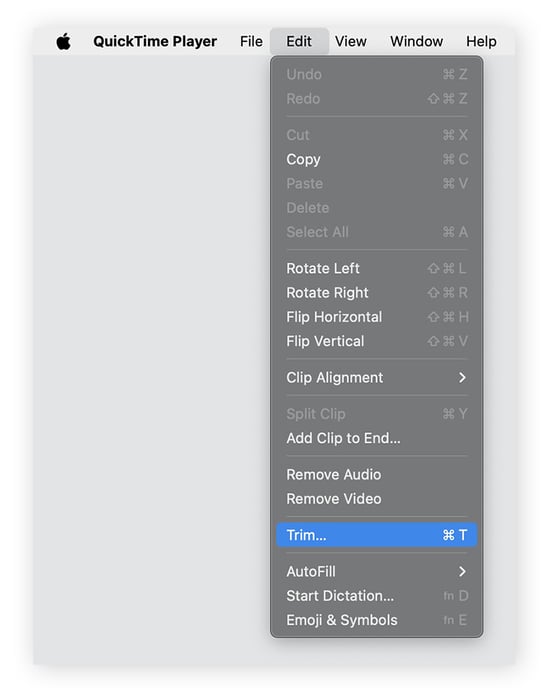
Open the screen recording you want to edit.
-
Select Edit in the menu bar, then click Trim.
-
Click and drag to trim the video on either end.
-
Click Trim to confirm the changes.
You can then save your edited screen recording to any location you wish. A typical issue with screen recording on a Mac is the lack of available space; by editing your screen recordings, you can create more space to save what’s most important.
Troubleshooting: Common screen recording issues on Mac
If your Mac is bloated and slow, your screen record quality will suffer. Learn how to speed up your Mac and how to delete Other storage on Mac to free up space. Then, try one of the best Mac cleaners to do a full cleanse before screen recording.
Here are some other common screen recording issues on Mac and how to solve them:
-
Mac won’t let you record
Here’s how to enable screen recording via security settings: On macOS Ventura or later, choose Apple menu > System Settings then click Privacy & Security. Select Screen Recording, then select the apps you want to allow to screen record.
-
Resolution issues
To adjust the resolution of your screen recording in QuickTime Player, select File > Export As and choose between 1080p, 720p, or 480p. You can also choose to export only the audio.
-
Space issues
QuickTime’s .MOV file format can result in massive file sizes. Handbrake is a free Mac app to convert .MOV files into more compact H.264 or HEVC formats. This reduces file size without impacting quality.
-
Overheating
You might have too many other applications, tabs, or animations and effects running. To help improve recording quality, close everything except what you want to screen record. If that doesn’t fix the problem, there are other ways to fix overheating on Mac.
-
Frame rate issues
Changing your Mac’s display resolution before exporting in QuickTime can help frame rate lag. Go to System Preferences > Displays to change the resolution of your Mac.
-
Bitrate issues
Mac doesn’t allow you to change the bitrate of your screen recording, but third-party apps do. Match the bitrate of the recording to the resolution you want. For 480p, the bitrate should be at least 500 Kbps. For 720p, you want 1 Mbps. For 1080p, you need at least 5 Mbps, and for 4K, at least 20Mbps.
Remember that Macs can get viruses and other malware, too. Your Mac needs to be healthy for the best screen recordings, with plenty of room to work. A quick tune-up can keep your Mac in the best possible shape.
Keep your Mac tidy with AVG TuneUp for Mac
AVG TuneUp clears out all the junk clogging your memory. It eliminates duplicate files and all those downloads from forever ago, and declutters your photo stash, giving you more room for new memories. It also blasts bloatware to boost RAM, so you can reclaim all that space for new screen recordings and other important data. Try AVG TuneUp to get your Mac revving again.