A VPN is an essential privacy tool for anyone looking to protect their privacy and personal data online. But if you’ve never used a VPN before, it’s easy to feel overwhelmed by how it works.
Whether you choose to set one up yourself or use a convenient app from a VPN provider, we’ll teach you how to get a VPN up and running on your Windows 10, 8, or 7 PC, or even on your router. And, we've got you covered if you need to set up a VPN on your mobile device, too.
Jump directly to:
Set up a VPN from a provider
Most consumer-level VPNs (virtual private networks) come in the form of convenient apps that are very easy to download, install, and set up. The VPN market is highly competitive, and providers are constantly refining their respective apps so that they're as intuitive as possible. There’s not a whole lot for you to do when it comes to setting up a VPN that you’ve purchased from a provider.
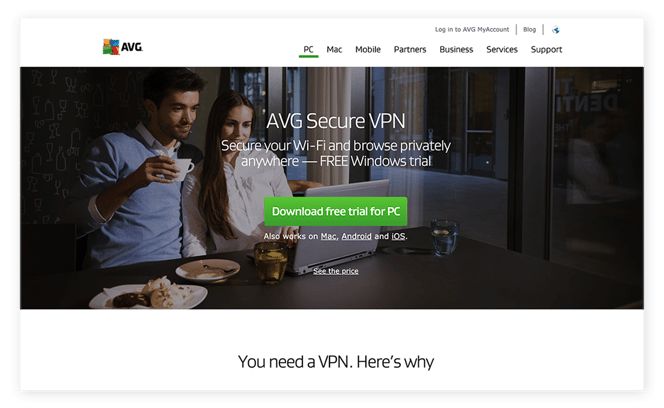
AVG Secure VPN is a self-contained, easy-to-use app that takes all the guesswork out of how to set up a VPN on Windows. But whichever VPN you choose, simply follow its installation procedure after downloading it onto your PC. Then, assuming you’ve created an account with a premium VPN service, you’ll need to log in with your username and password.
From that point on, you’ll enjoy secure, private browsing with your new VPN!
1. Choose a VPN service
VPNs offer a wide range of advantages compared to proxies and Tor, but whenever you connect to the internet via a third party, you’re entrusting your data to someone else. Here are a few things to consider when choosing a virtual private network provider:
-
Privacy: Does the VPN provider promise not to keep any logs of your online activity? Pick one that explicitly states a no-logging policy.
-
Security: How strong is the VPN’s encryption? There’s no point in paying for a weak VPN.
-
Trustworthiness: Does the company have a good reputation? Is the VPN provider’s jurisdiction governed by the rule of law? Do they have contact information on their website and a dedicated support team?
-
Compatibility: Does the VPN work on your chosen platforms? Many providers offer solutions for Windows, Mac, Android, and iOS. Make sure the app you choose works with Microsoft products and services and any other products, services, or devices you want to use it on.
Once you’ve chosen your VPN and signed up and paid for it, the next question is: How to use your VPN service? Just download the app, install it, and you’re ready to go!
2. Download the software
Make sure that you’re choosing to download a Windows version of your VPN software. Look for a “Download” page on the provider’s website, and if they don’t automatically offer the Windows version for you, select it yourself.
In this example, we’ll show you how to download a VPN onto your laptop or PC with our recommended choice, AVG Secure VPN (though we may admittedly be a bit biased). Click the Download free trial for PC button, and the VPN will begin downloading automatically.
 Many VPN providers feature large “Download” buttons on their websites.
Troubleshoot errors
In most cases, your VPN should install smoothly, without any errors. But sometimes you might get a strange notification or permissions request. If your antivirus software flags your VPN as malicious, stop the installation process immediately and check with your antivirus provider for more information.
During installation, your VPN may also ask you to disable a firewall (if you have one) or to accept unsigned drivers as part of the set-up process. These should be regarded as suspicious requests that could have terrible consequences — most reputable VPNs won’t ask you to compromise your computer security in such ways. A VPN should augment your security, not weaken it. If this happens to you, consider using a different VPN from a more trusted cybersecurity provider.
3. Pick your server
After installing your VPN and logging in, you’re almost ready to go — just a few more steps to take. Before proceeding, you need to choose a preferred server. Many VPNs will default to a server that’s most likely to give you optimal speeds while minimizing service interruptions.
Some VPNs allow you to change your server location, but note that you may experience slower speeds as a result. If you want to adopt an IP address in a specific country — for example, if you’re traveling abroad and want to access content from back home — we recommend you choose a virtual private network that allows you to manually change servers. Many VPN apps include simple maps that offer easy navigation between servers in different countries.
4. Change your settings
You’re almost done! There might be a couple more tweaks you need to make while setting up your VPN before you can get going. Your VPN provider should have specific guidance for their platform, but here are two things you might need to look out for:
-
Kill switch: If your VPN connection is interrupted, a VPN kill switch disables your internet to protect your data from inadvertent exposure. If your VPN has a kill switch, you’ll be able to activate it within your VPN app.
-
VPN protocol: There’s not just one way for a VPN to do its job — the systems that configure the connection between you and the VPN server are called protocols. Depending on your location and circumstances, some may work better than others. If you’re unsure which protocol to use, check with your VPN provider for details and guidance.
Set up a VPN manually
You don’t have to go with a VPN service if you’d rather DIY. First, you’ll need to create, purchase, or otherwise have access to a VPN server. For example, you may already have a VPN to connect to your company’s internal network, or you can set one up with a mainstream cloud computing service. Microsoft doesn't provide a VPN within Windows by default, so one way or another, you’ll have to get your own.
Once you have your server details, you’ll be able to manually set up your VPN on your computer. While it’s possible to do this safely and well — and many people do — you risk leaking your personal data should you make a mistake. You’re also missing out on a few key VPN security features, including:
-
Worldwide server coverage: When you DIY, you’ve got just one server to use. You won’t be able to “hop” around the world in search of optimal speeds. If choosing the location of your server or optimizing connection speeds is important to you, we recommend using a commercial VPN, like our own AVG Secure VPN.
-
Shared IP addresses: Many VPNs allow multiple users to share the same IP address, which makes it even harder for other parties online to identify and track users. You’ll be the only user of your VPN, so you won’t gain this benefit.
-
OpenVPN support: Microsoft doesn’t offer native support for OpenVPN in Windows, one of the most popular and secure protocols currently available. To access it, you’ll need to either download and install the OpenVPN client or simply use a commercial VPN provider’s app.
All that aside, if you’ve chosen to DIY, here’s how:
How to set up a VPN in Windows 10
-
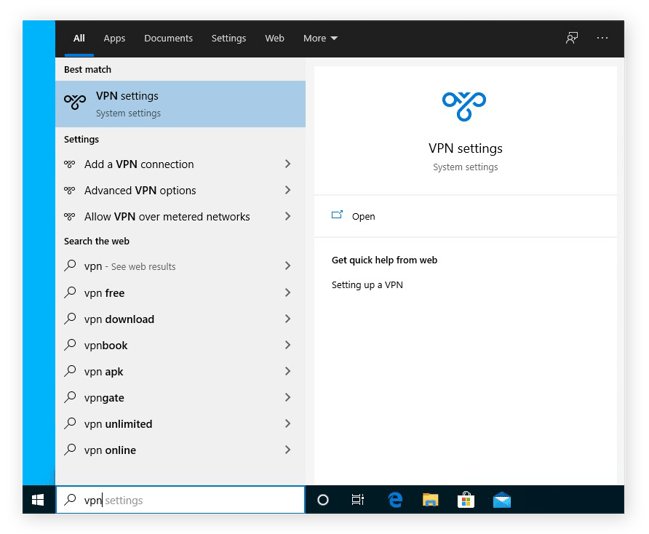
Open the Windows menu by clicking the Windows icon in the lower-left corner of your screen, then type “VPN.” You can also enter “VPN” directly into the Cortana search bar on the taskbar, if you have it enabled. Then, click VPN settings.
-
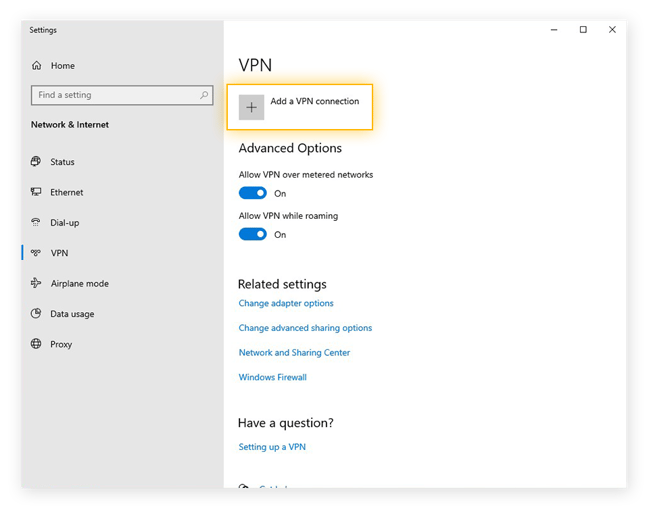
In the VPN menu, click Add a VPN connection.
-
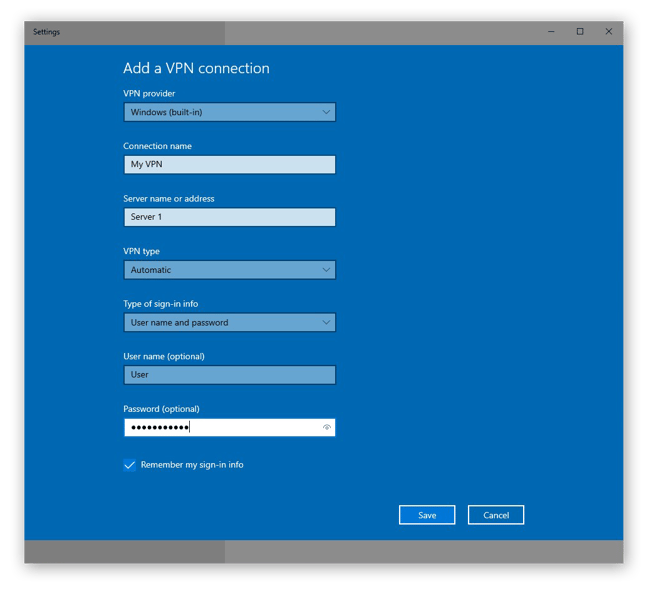
In the next screen, enter your VPN server details. In the VPN provider field, select Windows (built-in), then choose your connection protocol (in the VPN type field) and authentication method (in the Type of sign-in info field), and add all necessary information. Some protocols may require you to download and install additional software or security certificates. When you’re finished, click Save.
-
Click the Wi-Fi or Network icon in the system tray on your taskbar and connect to your new VPN.
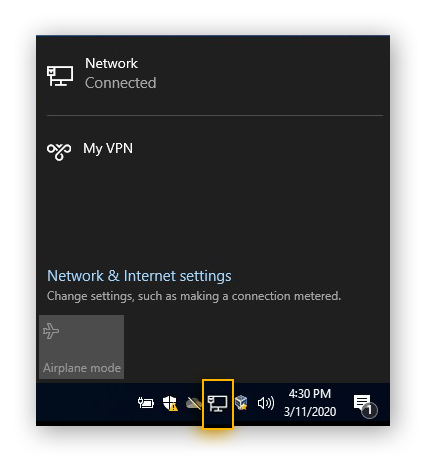 And that’s how to set up a VPN on Windows 10!
How to set up a VPN in Windows 8 and Windows 7
Setting up a VPN in Windows 7 is similar to how you’d set one up in Windows 8. For this example, we’ll show you how to set up a VPN in Windows 7:
-
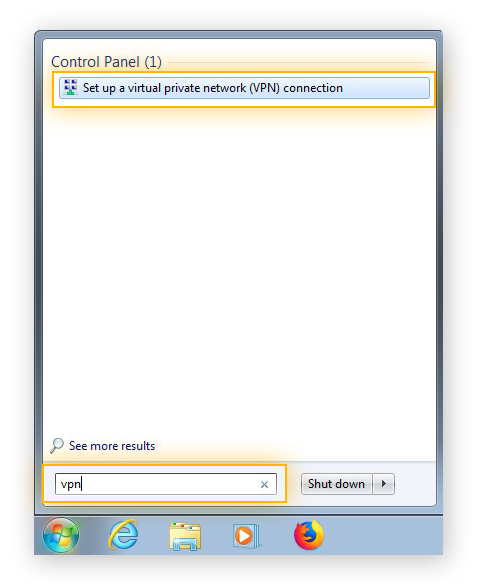
Click the Windows icon on the taskbar in the lower-left corner of your screen. Enter “VPN” into the search box, then click Set up a virtual private network (VPN) connection.
-
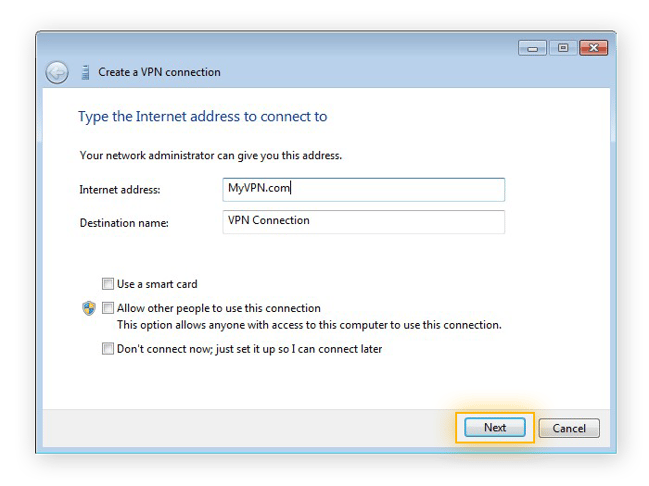
Enter the IP address or web address of your VPN server, then click Next.
-
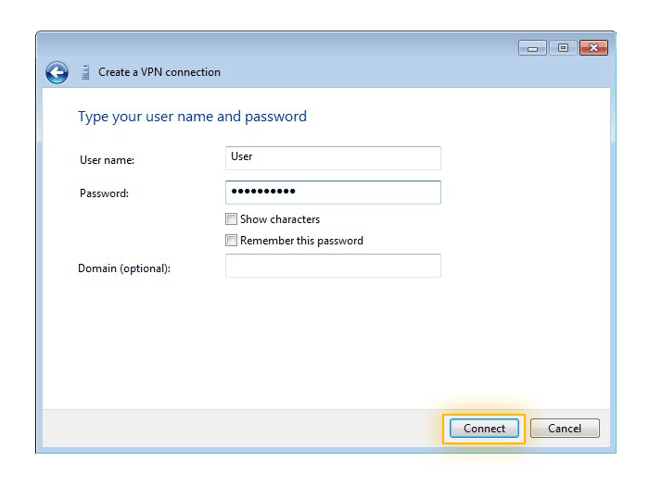
In the next screen, enter your username and password, then click Connect to activate your new VPN.
 You can use the instructions above as a guide to set up a VPN in Windows 8 as well.
How to set up a VPN on your router
Rather than setting up a VPN on your computer, you can configure it on your router instead. This has the added benefit of applying the VPN’s coverage to all devices on your network, which extends protection to devices that otherwise wouldn’t support VPN traffic. Just note that the connections between the devices and the router won’t be encrypted. It’s also less convenient to set up and maintain a VPN connection this way, since you’ll need to log into your router’s internet settings.
While the specifics vary depending on the type of router you have, here’s a general guide to setting up a VPN on your router:
-
Log into your router. Assuming you’ve changed your router’s username and password at least once — and if you haven’t, you should — you’ll have already logged into your router before. If not, follow the login instructions in your router’s user manual (and change your login credentials while you’re there).
-
Set up your VPN. Your router may have a dedicated VPN section within its settings. If so, enter your VPN server and login credentials there. If not, you’ll need to configure your router to connect to your VPN server. Consult your router’s user manual for specific instructions.
Once you’ve configured your router to use your VPN, give it a shot! Make sure to connect with several different devices and ensure everything works smoothly.
Do I need a VPN?
Setting up your own VPN can be challenging, but using an app from a commercial VPN provider is quite easy. Either way, the benefits of using a VPN are more than worth the effort. Compared to both free proxies and Smart DNS services, VPNs are both more private and more secure. Here are three big advantages you can get with a VPN:
 Hide your IP address: Your IP address tells everyone online who and where you are. A VPN replaces your IP address with one of its own, so that whatever you do won’t be traced directly back to you. Only your VPN provider can see your original IP address, which is why you should pick a trustworthy one who won’t keep user logs.
 Encrypt your connection: VPNs create a secure, encrypted connection between your device and the VPN server for all your internet traffic. VPNs, compared to proxies and Tor, work within your device’s operating system to encrypt your entire internet connection. This is how VPNs protect you while you’re on unsecured public Wi-Fi — no one else on the network with you will be able to see what you’re up to.
 Access blocked content: Many organizations, such as schools and companies, block connections to various websites. You can get around those restrictions by connecting via your VPN. Some countries also restrict certain areas of the internet, and while a VPN may help you circumvent those blocks, your VPN use may be illegal in those countries. Always use your VPN legally.
Can I use a free VPN?
In most cases, you will have to — and should — pay for your VPN. Whether you subscribe to a premium commercial VPN or set up your own with a private server, you’ll need to pay for those services. Though free VPNs exist, we don’t recommend using them, because you may be leaking more of your personal data than you’re protecting. Free VPNs have issues with:
-
Poor security: Free VPNs are unlikely to use the strongest VPN protocols.
-
Fewer servers: With just a few servers available, free VPNs will easily become crowded and slow down.
-
Intrusive ads: Free VPNs need to make money somehow, so some inject annoying ads to generate revenue.
-
Data mining: Another way free VPNs generate revenue is by monetizing their user base via data mining.
-
Download limits: Free VPNs often limit how much data you can download or upload.
You’ll have an easier (and safer) time if you use a robust VPN app from a trustworthy provider. Some are easier to use than others. But if you review your options and check out user reviews, you’ll get an idea of what your experience might be like. We recommend AVG Secure VPN for its high security standards, speedy servers, and unlimited service.
When to use a VPN
If you’re not sure where and when to use a VPN, you should consider the security of the network you’re using and how sensitive your tasks are. Here are some scenarios where a VPN might help:
-
Public Wi-Fi: Free, unsecured public Wi-Fi networks are a huge security risk. They can be easily hacked, potentially exposing every site you visit and every action you take. To keep your passwords and other sensitive info safe, always use a VPN when you’re connected to public Wi-Fi.
-
Banking or online shopping: When using your sensitive personal data, like the password to your online banking account or your credit card number, we highly recommend turning on your VPN to encrypt your traffic. But make sure to use a VPN server in your home country. If your bank detects you trying to sign in from an unfamiliar location abroad, they may flag it as fraud.
-
Streaming: If you want to watch TV online or stream content from another location — if you’re traveling abroad but want to access your home streaming service, for example — you can use a VPN to appear to be in another country. But if you’re struggling with buffering while streaming, you might want to switch the virtual private network off or try a different VPN server.
-
Gaming: Generally, VPNs are not necessary while gaming. Just make sure you don’t leave anything sensitive, like your online banking, open at the same time.
-
Regular web browsing: If you’re just using Chrome, Edge, or even Internet Explorer, to look something up, you might not need your VPN on. But keep in mind that your IP address can still be used for some forms of online tracking.
-
Slow Wi-Fi: You may think that slow Wi-Fi doesn’t mix with a VPN. If you’re experiencing Wi-Fi issues, first try to boost your Wi-Fi signal. You can also try using a different VPN server. If your Wi-Fi is still slow, you may need to call your provider and get it fixed. In the meantime, you should use your VPN for only the most sensitive tasks.
Set up a VPN with ease
AVG Secure VPN is as easy to use as it is powerful — which is to say, very. We’ve designed it to be as intuitive as possible, so you can enjoy the security and privacy of our super-speedy VPN right away. Military-grade encryption keeps your data protected while over 50 servers empower you with blazing-fast connection speeds and multiple location options.
Connect to the internet, turn on your VPN, and you’re ready to go. Upgrade your internet privacy the easy way with AVG Secure VPN.