How to clone your hard drive in Windows 10 & 11
To clone your hard drive in Windows 10 or 11, you’ll need to use disk cloning software to copy all of your data — including system files, apps, and settings — to a new drive. Cloning a drive is a great way to back up data, create an instance that helps you recover from drive failure, or upgrade from a hard disk drive (HDD) to a solid state drive (SSD).
1. Prepare your drives
To get started, identify the source drive you want to clone and the destination drive where you’ll clone it. These can be HDDs or SSDs — the cloning process works the same regardless of drive type.
On desktop computers, you can clone one internal drive onto another without cables. For laptops where one drive is external, you’ll need to connect it with a SATA-to-USB adapter, dock, or enclosure.
Before cloning a hard drive in Windows, you should:
-
Clean up the drive: To speed up the process and avoid copying junk onto your fresh drive, remove any temporary files, caches, bloatware, and duplicate programs from the source drive. You can do this manually or speed up the process by using AVG TuneUp to free up disk space and streamline your device in minutes.
-
Back up your data: To plan for the risk of anything going wrong during the clone and all of your data being lost for good, take a snapshot of your PC and hard drive. Open Settings > Update & Security > Backup, then use File History or Backup and Restore to back up your files or create a system image before cloning.
-
Choose the right destination drive: Ensure that the drive you’re cloning data onto is large enough (and has enough free capacity) to store everything. This is especially important if you’re switching from an HDD to an SSD, as the latter may have a smaller capacity.
-
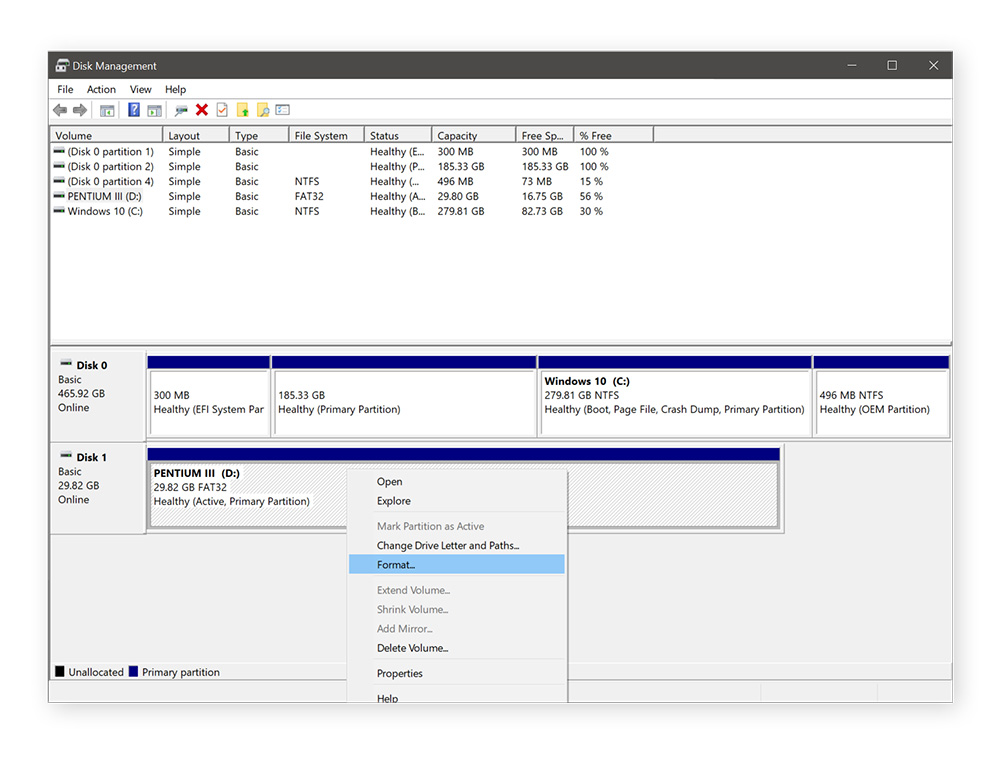
Format your hard drive: Formatting the destination drive ensures it's clean, compatible, and ready for use. Right-click the Start icon in your taskbar > Select Disk Management > Right-click the new drive > Select Format > Choose a file system (like NTFS) and click OK. Just bear in mind this will permanently delete any data that’s already stored on the drive.
-
Select cloning software: While Windows includes backup tools like System Image Backup, it doesn’t offer true disk cloning features. There are several reputable choices of drive cloning software to decide between. Macrium Reflect offers a balance of power, ease of use, and reliability. Other options include beginner-friendly EaseUS, or the more powerful Clonezilla for experienced users.
2. Create the cloned drive
With both your drives and back-up prepared, and a choice of cloning software in mind, you can move on to the main part of the process. Follow these steps to create a cloned drive on Windows.
Bear in mind this guide describes the process using Macrium Reflect. While the process should be similar using other tools, the name of each option may be slightly different. Make sure to follow official guidance from your chosen software provider.
-
Download and install the drive-cloning tool: Make sure you choose a reputable third-party cloning software. Pay close attention to user reviews and make sure you download the software from the official website to avoid accidentally installing malware. In this example, download and install Macrium Reflect.
-
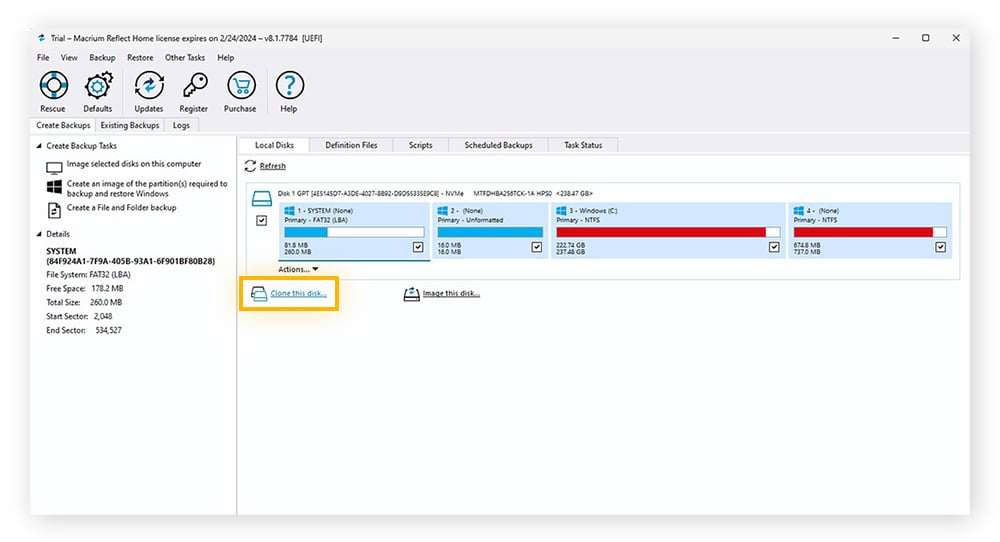
Connect your secondary hard drive: Launch Macrium Reflect and go to Create Backups > Local Disks (the default view) > Select the source drive and click Clone this disk. In the Local Disks tab, you’ll see your disk’s partitions. If you only need a data clone — not a bootable system — uncheck all partitions except Windows (C:).
-
Specify the clone destination: Click Select a disk to clone > Choose the target drive you want to copy data from, and then click Next.
-
Set the clone to run: Review your choices, then click Finish to clone your drive.
You can also clone an external drive onto your PC if you wish. To do so, follow the same process detailed above, but choose the external drive as the source drive and your PC’s drive as the destination drive.
3. Check the clone has worked
You can boot your computer from the cloned drive to check that everything’s working properly. To do this, you’ll need to enter BIOS (Basic Input/Output System), which is your computer’s firmware settings. On newer computers, BIOS has been replaced with UEFI (Unified Extensible Firmware Interface).
Here’s how to boot your computer from your new clone drive:
-
Press Start > Power > Hold Shift and click Restart > Keep holding Shift until the Choose an option screen appears.
-
Click Troubleshoot > Advanced Options > UEFI Firmware Settings > Restart.
-
When your computer boots into BIOS or UEFI, Iook for an option that says Boot Configuration, Boot Options, Boot Manager, Boot Order, or something similar (usually under System Configuration or System Settings).
-
Select the cloned drive that you want your PC to use for start-up, and then click Save & Exit.
-
Your PC should automatically restart and boot into the newly cloned drive.
How to clone your hard drive on a Mac
The Disk Utility program built into Macs includes a tool for duplicating drives, which you can use to create a duplicate hard drive image on your Mac or an external hard drive. The process is the same whether you’re cloning an HDD to another HDD, an HDD to an SSD, or an SSD to another SSD.
1. Prepare your drives
To clone a hard drive on a Mac, you’ll need two drives: a source drive that you want to clone and a destination drive you want to copy data to. On a desktop Mac, you can clone between internal drives. If you’re trying to clone a drive on a MacBook, you will need to connect an external drive via USB, Thunderbolt, or a compatible enclosure.
Before cloning your Mac’s hard drive:
-
Declutter your drive: Avoid copying gigabytes of unnecessary files, duplicate photos, and programs you no longer need to speed up the drive cloning process. Clear out junk files manually or using a tool like AVG TuneUp, which clears caches, RAM, logs, and other unused files.
-
Back up your data first: Use Time Machine or create a manual backup to safeguard your files before cloning, just in case something goes wrong.
-
Pick the right destination drive: Ensure the drive you’re cloning to has enough space to hold all your data, especially when moving from a larger HDD to a smaller SSD.
-
Choose your cloning tool: The built-in Disk Utility program has a restore feature that works fine for basic cloning needs, or you can use a reputable third-party option like Carbon Copy Cloner or SuperDuper!. Just make sure you’re downloading any third-party software safely from the owner’s website, and check reviews to ensure it works for your needs.
-
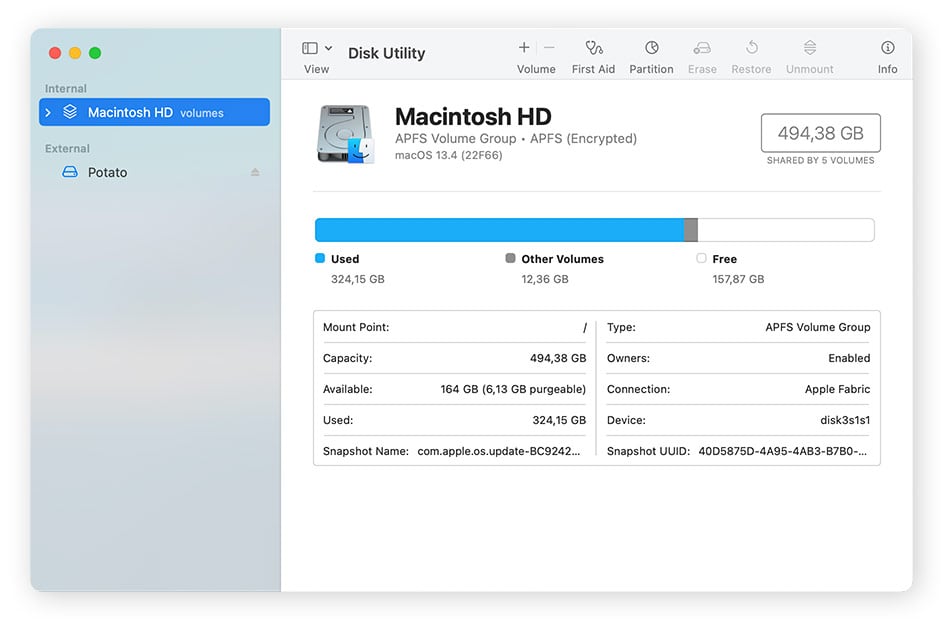
Prepare the new drive: Use Disk Utility to erase and format the destination drive as APFS or Mac OS Extended to guarantee compatibility and a fresh start. Open Disk Utility by going to Finder > Go > Applications > Utilities > select the new drive from the sidebar, and then select Erase > APFS or Mac OS Extended > Erase to format the drive for macOS. Bear in mind that this will erase any data currently stored on the drive.
With everything prepped, you’ll be ready to create an exact, bootable copy of your Mac drive hassle-free.
2. Clone your drive using Disk Utility
Connect your external hard drive if necessary, then follow the steps below (carried out on macOS Sonoma) to clone a Mac hard drive.
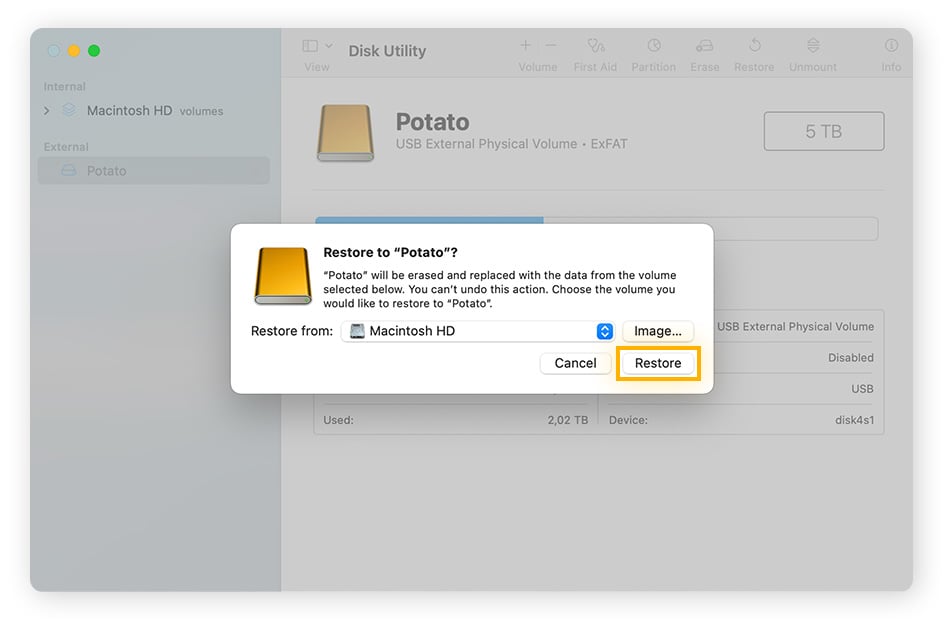
Disk Utility calls cloning “restoring” a drive — it works for copying files, but isn’t ideal for bootable clones, since it may skip hidden system files. For reliable startup drives, use third-party tools instead.
-
Run Disk Utility: In Finder, select Go > Utilities > Double-click Disk Utility. Alternatively, open Launchpad from the Dock > Type Disk Utility > Click the Disk Utility icon.
-
Restore your destination drive: In Disk Utility, select the drive you want to clone to in the sidebar > Click Restore > Choose the disk drive you want to copy data from, then click Restore again.
-
Wait for disk duplication: Monitor the status bar of the disk duplication and, once it’s completed, click Done.
Remember, while Disk Utility can duplicate files, it may not produce a bootable clone — for that, you’ll need to use a suitable (and trustworthy) third-party option.
3. Boot up the new drive
You can test if your cloned drive works properly by booting your Mac from it. To boot up from a cloned drive on a Mac, you must first load the startup options and change the startup disk. The process for doing this depends on what chip your Mac uses, which you can check by clicking the Apple icon in the toolbar > About This Mac > Chip.
-
On a Mac with an Apple silicon chip: If your Mac has a silicon chip (M1, M2, etc.), turn it off as usual, then press and hold the Power button until you see Loading startup options.
-
On a Mac with an Intel chip: Turn off your computer as normal, then press and hold the Option key as you press the Power button to turn it back on.
-
On a Mac mini: Shut down your Mac mini, connect the new drive, hold Power on your Mac mini to load startup options, select cloned drive, then Boot, and check apps/files.
Select the cloned drive from the available startup disks, then click Continue or the up arrow, depending on your Mac type. The next time you restart your Mac, it will boot up from the disk you selected.
Cloning a hard disk to SSD
Cloning your hard drive to an SSD can give you increased PC speed, durability, and security for your data. SSDs boot and load faster, while also being lighter and less energy-intensive. The biggest downside to switching to an SSD is the cost, as it’s newer tech that typically comes at a higher price tag.
You can clone an HDD to an SSD using exactly the same process as you would to clone an HDD to another HDD. You don’t need specific software to clone a hard drive to an SSD.
How long does cloning a hard drive take?
It can take anywhere between 10 minutes to an hour to clone a hard drive, depending on the speed and health of the drives involved, the amount of data being transferred, and the cloning software you’re using. Cloning a 500 GB drive, for example, should take about an hour at a consistent transfer rate of 100MB/s.
The hard drive cloning process will typically take longer if you’re cloning an HDD to an SSD compared to the time it takes to clone an SSD to another SSD. NVMe (Non-Volatile Memory Express) SSD drives offer the fastest transfer speeds. But you’ll need to use reliable, NVMe-compatible cloning software like Macrium Reflect to be sure your data doesn’t get corrupted in the process.
Can you clone a drive without software?
You can clone a drive using built-in system tools or dedicated hardware. These are the two main methods:
-
Using built-in tools: Windows and macOS both offer basic cloning tools, but they have limitations. Backup and Restore (Windows) can create system images but not full clones, while Disk Utility (macOS) isn’t ideal for creating bootable clones.
-
Using hardware cloning devices: A standalone drive duplicator can clone drives without a computer — just connect both drives and press a button. This is a good option if you’re looking to create a 1:1 drive clone, but you’ll have to buy the device.
However, for full control over bootable cloning and partitions, using reliable and trustworthy third-party software is recommended.
Keep your new hard drive running smoothly with AVG TuneUp
Whether you want to clean up your source drive to reduce the amount of unnecessary data that’s transferred or optimize your new destination drive to keep it running smoothly for longer, AVG TuneUp can help.
It automatically manages your drive to remove unnecessary bloatware and temporary data, so you don’t get bogged down with unwanted junk. And it even boosts computer performance by snoozing inactive programs and background processes that slow you down. Download AVG TuneUp today to enjoy optimal performance and speed for years to come.


/Signal-How-to-scan-and-fix-hard-drives-with-CHKDSK-in-Windows-Thumb.jpg)