1. Check your external hard drive for physical issues
If your computer isn’t recognizing an external hard drive, start by checking the drive for any visual signs of damage or issues. Make sure it’s definitely powered on by looking for lit LEDs, and inspect any connecting cables for damage, for example.
If you’ve recently dropped the device or exposed it to extreme heat or moisture, there’s a chance the drive suffered internal damage that’s impossible to identify from the outside. Unless you’re proficient and confident in your tech skills, you’ll need to contact a specialist or data recovery company to try to fix the drive or salvage any stored files.
2. Try a different USB port or computer
The connection between your external hard drive and Mac or PC can also cause problems. USB ports come in different iterations, for example, and you might be connecting a drive that requires the extra power from a USB 3.0 port to a USB 2.0 port on your computer.
Some drives are even designed to draw additional power through a Y-cable, which connects to two USB ports at once. If your drive originally came with a Y-cable but you’ve since switched to a single USB cable, that might explain the issue.
To troubleshoot whether your hard drive isn’t showing up due to connectivity problems, try these troubleshooting steps:
-
Plug the drive into a different USB port on your computer.
-
Swap the USB cable out for another, newer version, or a Y-cable.
-
Test the drive on another computer.
3. Check your drive is enabled or mounted
If your external drive is not showing up in File Explorer or Finder, you may need to enable or “mount” the drive before using it. This can be done using Windows Disk Management on PC, and Disk Utility if you’re on a Mac. Here’s how to enable your external drive on both systems:
Using Windows Disk Management
Windows Disk Management is a utility that allows you to view, partition, format, or troubleshoot storage devices with Windows. If your external drive isn’t showing up, you might just need to enable it by assigning a drive letter to the storage device.
Here’s a step-by-step guide to doing it with Windows Disk Management:
-
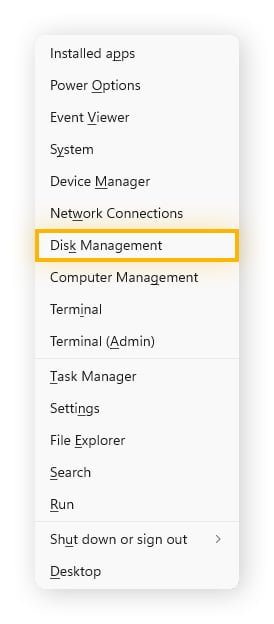
Open Windows Disk Management by pressing the Win + X keys, then select Disk Management in the menu that appears.
-
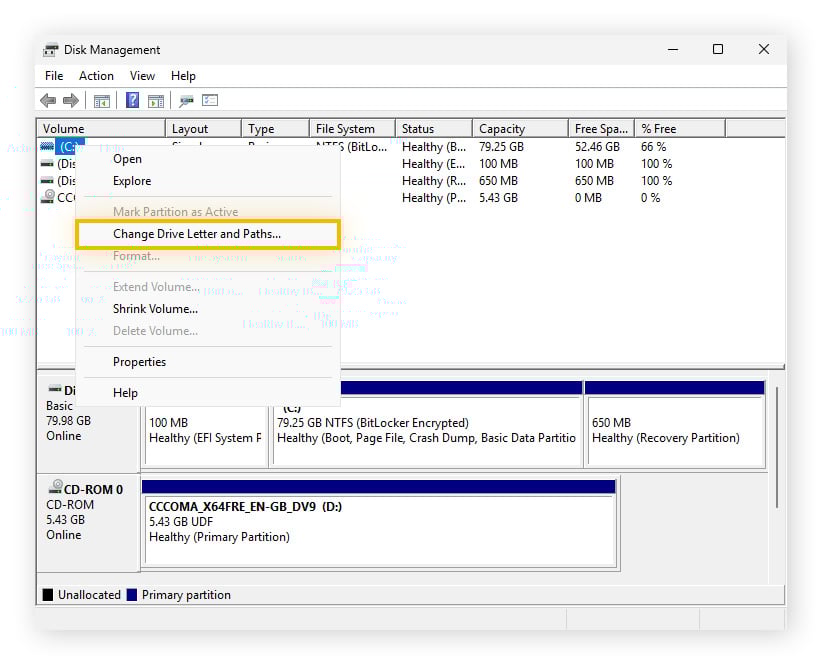
Locate the correct storage device from the list, using the storage availability to identify it. Once you’ve found the right drive, right-click it and select Change Drive Letter and Paths.
-
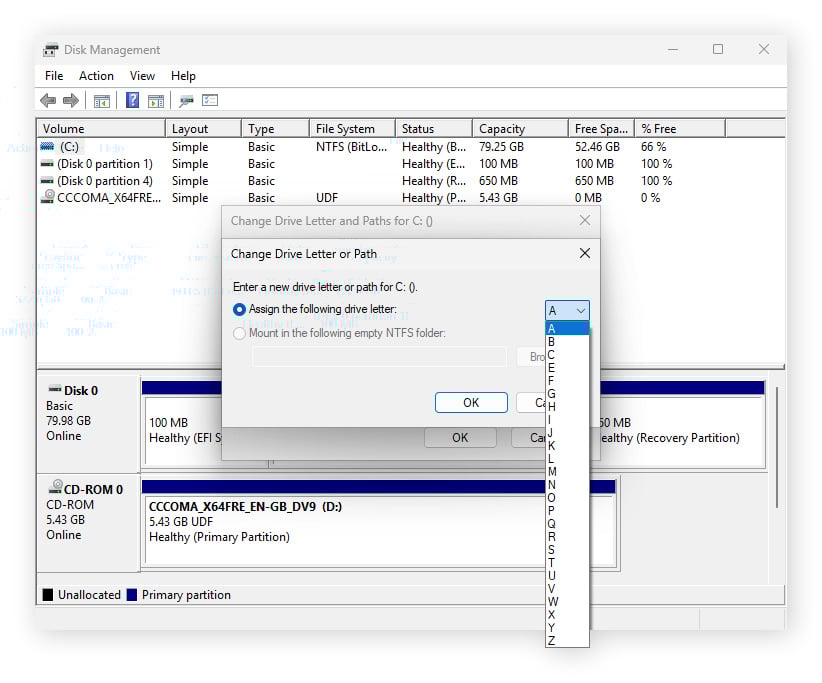
In the window that appears, click Add and then choose a drive letter from the dropdown list. After you’ve selected a letter, click OK and try unplugging and plugging your device back in to see if it appears in File Explorer.
Using Disk Utility on Mac
Disk Utility is the program to use to manage storage devices on Macs or MacBooks. It allows you to view, format, erase, partition, rename, and repair the storage devices connected to your Mac.
If your storage device isn’t appearing in Finder, use Disk Utility to give it a new name:
-
Go to Applications > Utilities > Disk Utility.
-
Find and click the volume you want to rename, highlight the current name by clicking it, then right click and select Rename.
-
Type the name you want your drive to appear under, then press Enter.
Your storage device should now appear as the name you chose when using Finder.
4. Reinstall or update your drivers
Various hardware components in your computer need a specific type of firmware called drivers to function, but new driver versions release all the time. There are graphics drivers, network drivers, audio drivers, and even storage drivers. If you’re looking to maximize computer performance, making sure your drivers are up to date should always be at the front of your mind.
Outdated storage drivers, which enable the operating system to interact with physical drives, can cause hard drive issues. Let's look at some of the different ways you can manually update your drivers on Windows or Mac, and how you can automate the process using specialized software.
On Windows
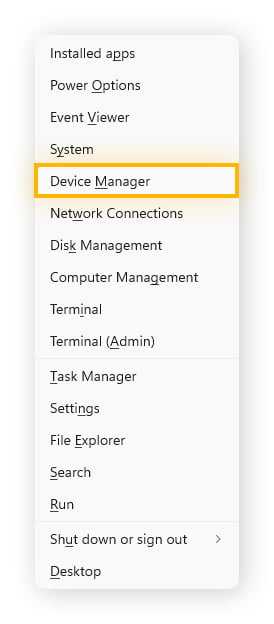
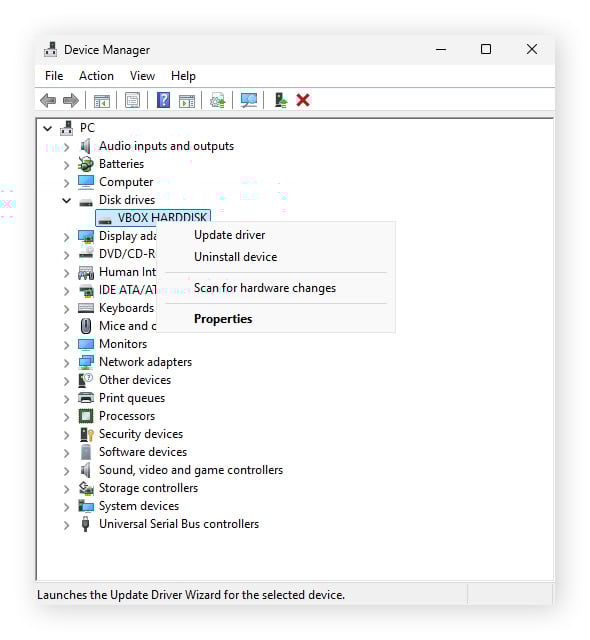
Windows has a built-in program designed to help you manage hardware components, called Device Manager. It lets you manually update drivers for specific components, including your hard drive. To update your drivers with Windows, follow these steps:
-
Open Device Manager by pressing the Win + X keys, then select Device Manager in the menu that appears.
-
Find and right click your storage device and select Update driver. You’ll find your disk under Disk drives, Storage controllers, or the Portable devices categories.
-
From here you can choose if you want Windows to search for and install the correct drivers for you automatically, or install drivers you’ve already downloaded directly from the hardware manufacturer.
On Mac
Mac driver updates are bundled into macOS updates, so you shouldn’t need to look for them individually. Here’s how you can check for and install the latest version of macOS when it’s available:
-
Click the Apple menu in the top-left corner of the screen, then select System Settings.
-
Go to General > Software Update > if an update’s available, click Update Now.
Using AVG Driver Updater
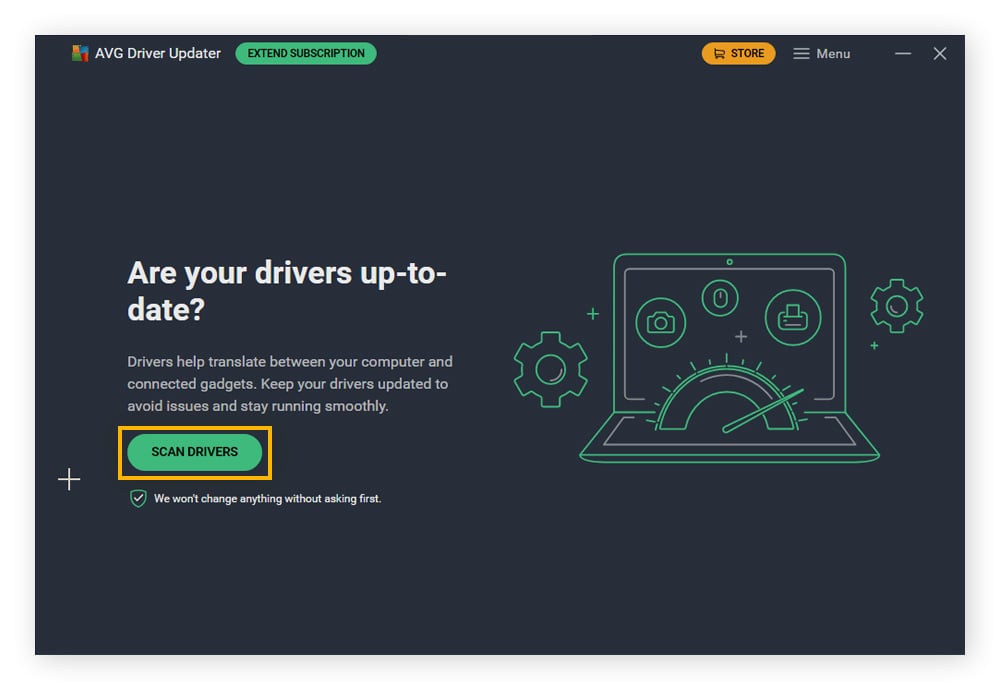
The generic drivers that are bundled with operating system updates are typically enough to get your hardware working, but sometimes a driver update becomes necessary to patch a compatibility or performance issue. It can get tedious to keep track of what drivers you need to update manually, but AVG Driver Updater can help automate the process, finding new drivers as they become available.
Here’s how you can simplify and automate keeping your drivers current with AVG Driver Updater:
-
Open AVG Driver Updater and click SCAN DRIVERS to begin the scan of your current drivers.
-
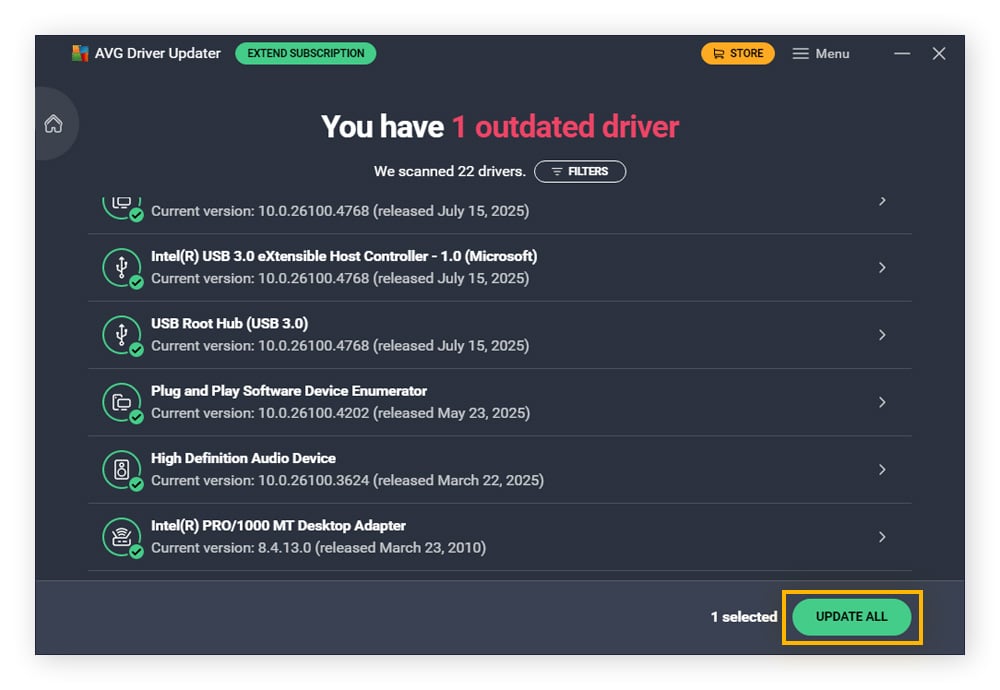
Once this scan is complete, you can click UPDATE ALL to download and install the available updated drivers.
-
That’s it! Your drivers are now updated and there’s nothing more you need to do.
AVG Driver Updater keeps a database of more than 50 million drivers, so you can be confident it will capture just about any new driver you need. It also pre-checks for any malware before installing drivers. Stay up to date and safer at the same time — try it free for 15 days.
5. Scan and repair the external drive
If your external hard drive is detected but isn’t showing up in your file browser, it may be a sign of corrupt system files. This doesn’t necessarily represent a major hard drive failure requiring a replacement — it’s often possible to fix the issue with built-in system tools.
Here’s how you can attempt to repair a corrupted external drive on Windows and Mac:
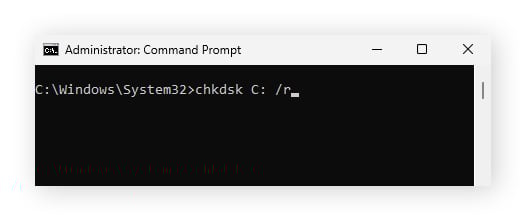
Scan using CHKDSK (Windows)
CHKDSK is a built-in Windows utility for scanning and repairing system files and storage devices on your PC. To use CHKDSK, you’ll need to run a Command Prompt, following these steps:
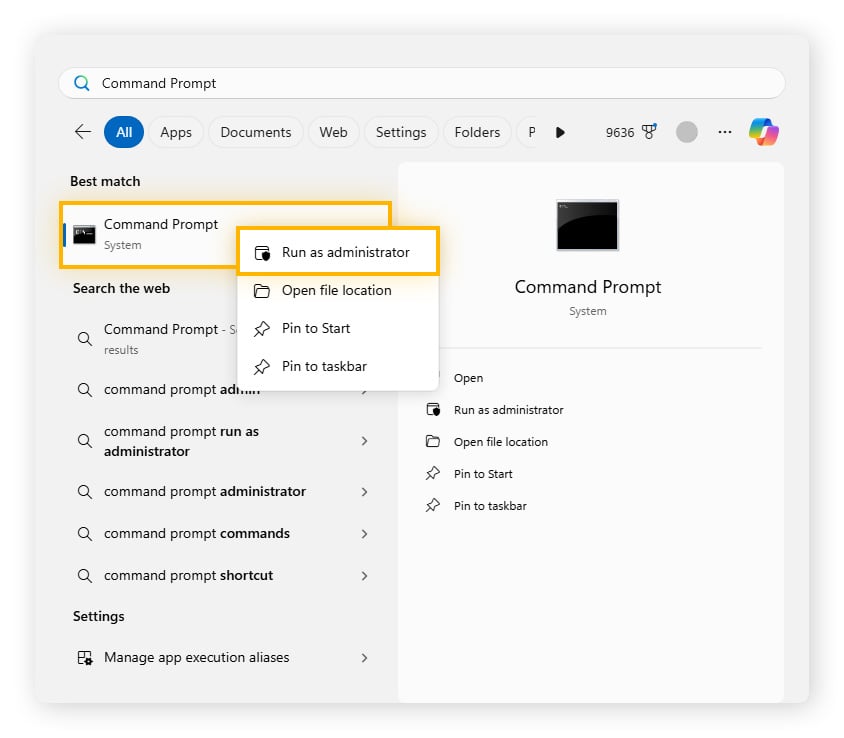
- Open Command Prompt by clicking the Start menu and searching for Command Prompt. Right-click Command Prompt and Select Run as administrator.
- In the window that opens, type chkdsk <your device drive letter here>: /r and press Enter to scan, repair, and attempt recovery of any files on the device.
Scan using Terminal (Mac)
macOS also has a built-in utility for scanning and repairing corrupted storage called diskutil which is available when using the Terminal. Here’s how you can use diskutil to scan for and repair problems with your storage devices:
-
Go to Finder > Applications > Utilities > Terminal.
-
In the window that appears type diskutil list to list all connected drives, their names, types, sizes, and identifiers.
-
Once you have found the right identifier, type diskutil info <identifier> and look for the Volume Name in the output.
-
Type diskutil verifyVolume /Volumes/<volume name> to check the storage for problems and diskutil repairVolume /Volumes/<volume name> to attempt repair of the corrupted storage.
6. Format the drive
The last resort if none of the steps above work is formatting your hard drive. This wipes it completely, meaning you’ll lose all data stored on the drive. So it’s important to first clone the drive or otherwise back up your PC or Mac so you don’t lose files permanently.
On Windows, you can use Windows Disk Management to format an external drive. On Mac, you’ll use Disk Utility instead. Here’s a handy guide to formatting a drive on both systems.
Keep your devices performing at their best with AVG TuneUp
Facing issues with external hard drives can be frustrating and tedious, stopping you from accessing files when you need them. Using the steps above should help you troubleshoot the problem and find the right solution. And, to keep your hard drives in better shape in the future, use AVG TuneUp. It provides automatic device maintenance that cleans up junk files from your computer and keeps the software you need up to date, helping save space and speed up your PC or Mac.
FAQs
Why do external hard drives become unreadable?
External drives can become unreadable for a range of reasons like being dropped and broken, having damaged cables, or being unplugged while data is being written.
How do I recover files from an undetected external hard drive?
Recovering files from an undetected external drive depends on the cause of the issue. Begin with basic troubleshooting: try a different USB port or cable, rename the drive, or assign it a new drive letter. You can also use built-in repair tools or check for driver updates. If the drive remains undetected or shows signs of physical damage, consult a professional data recovery service.
What is the life expectancy of an external hard drive?
The lifespan of a hard drive depends largely on its type. Hard disk drives (HDDs) with moving mechanical parts are generally expected to last around 3-5 years. Solid state drives (SSDs), which have no moving parts, tend to have a longer life expectancy of around 10 years. Which drive is best depends on your budget and needs.


/Signal-How-to-scan-and-fix-hard-drives-with-CHKDSK-in-Windows-Thumb.jpg)