Why back up your Android and where do backups go?
Backups ensure that your Android apps and data stay safe and recoverable. Android device backups are securely stored on Google servers via Google Drive, and are encrypted with your Google Account. You can access and manage your storage space and backups through the Google One service.
Backed-up data is typically deleted if a device isn’t used for 57 days, or if Android backup is manually disabled. But don’t panic! This auto-cull excludes photos and videos backed up to Google Photos. For a full rundown on how Google uses your data, check the latest policies if you’re unsure.
You get 15GB of free storage across Google Drive, Gmail, and Google Photos, and can upgrade to more storage via a paid plan if needed.
Regular, reliable backups are vital so nothing is irretrievably lost — even if you break your phone, like the 25% of US users who have dropped their phone or the 3% whose dog chewed theirs (AT&T survey).
And remember: Moving large files to the cloud also gives your phone and apps the space they need to “breathe” and function better. It also helps stop Android apps crashing.
How to back up your Android phone
You have a few choices: You can back up your Android data using your Google Account and Google One, either directly via the app or from within your device settings. It’s also a good idea to automate backups, so it’s one less task to worry about.
Your Android device is designed to work seamlessly with Google One and can back up your phone’s entire dataset (not just individual files), including:
-
App data: Including app settings and preferences.
-
Call history: Logs of your incoming, outgoing, and missed calls.
-
Contacts: Saved to your Google Account.
-
Device settings: Such as Wi-Fi passwords and wallpapers.
-
SMS and MMS messages: Text and multimedia messages.
-
Photos and videos: Provided that Google Photos backup is enabled.

Note:
For the instructions in this article, we’ve used a Samsung Galaxy S24. Steps may vary slightly according to your device’s make and model.
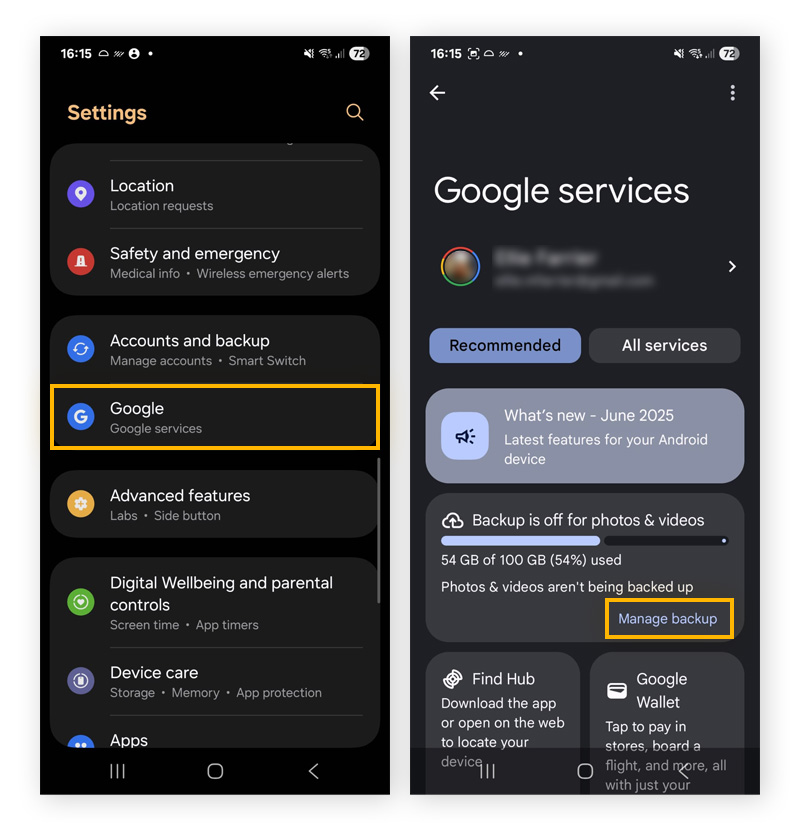
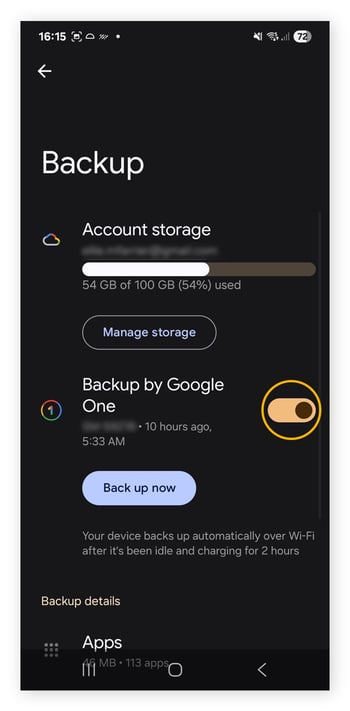
From your Android settings
-
Open your device Settings, then tap Google services. Scroll down and tap Manage backup.
-
Ensure Backup by Google One is toggled on for automated backups.
-
Tap Back up now to run a manual backup.
Using the Google One app
You can also back up and manage your data via the Google One app, available on the Play Store. It offers additional features and a user-friendly interface for managing backups.
-
Open the app and tap the Storage tab.
-
Tap Set up data backup (if prompted). Or, tap the three-line menu in the top-left corner of the screen and tap Settings > Manage backup settings.
-
Tap Back up now.
For more information, see Google’s official support guide on installing Google One. If you’re curious about what Google has, find out how to download your Google data with the handy Google Takeout tool.
Via third-party apps
You’re spoiled for choice when it comes to third-party apps offering backup services, including those that provide cloud storage and local backups. But be careful — you’re entrusting your potentially sensitive information to third parties. Use trusted app stores and always review app permissions before you install an app.
It’s vital to do your homework and be alert to potential dangers, such as:
-
Data leaks: Using unverified apps might risk your data being exposed and misused by scammers, leading to digital identity theft.
-
Excessive data permissions and collection: Check that they’re not requesting access to permissions that aren’t necessary to function. Doing so may mean they’ll misuse your digital footprint.
-
Incompatibility and poor performance: Some apps may be poorly designed and not optimized, leading to compatibility issues and crashes.
-
Unsafe data practices: Data could be poorly encrypted or shared with third parties.
-
Malicious apps: Fake backup apps are designed to steal information; not back it up. They could also be laced with malware.
Backing up with a USB cable
Use a USB to connect your Android phone to external storage, such as your Windows computer. Then follow these steps:
-
On your device, tap the Charging this device via USB notification.
-
Select File transfer.
-
A file transfer window will open on your computer. Use it to drag files.
-
When you've finished, eject your device from Windows.
-
Unplug the USB cable.
This is ideal if you want a physical, offline backup.
Managing backups: Automated or manual?
Imagine suddenly losing every photo and contact, and not being able to restore any of it. That’s exactly why we recommend automatic backups. Regularly backing up your years of saved data helps safeguard you from data loss, and automation makes it more consistent and convenient. When you let your phone system take charge, you free yourself from the time and hassle of manual backups.
Automated backups (recommended)
Google automatically backs up Android phone data if the following conditions are met: The phone is connected to Wi-Fi, charging, and idle. Backups are meant to occur at least once every 24 hours (if you enabled automatic backups in your settings).
These (or similar) are the general steps for most Android phones:
-
Go to Settings > Google services and preferences > Backup (or Backup and restore).
-
Turn on Backup by Google One. You’ll also see a notification telling you precisely when your phone was last backed up.
Manual backups
Is your Android clogged with too many videos or failing to update due to low storage space? Manual backups are an option if you’re looking to save storage space, have a limited data plan, or want more control over the backup frequency. Manual backups do take time though, and as you’re a “mere” human, your backup efforts may be prone to errors, which could lead to incomplete backups and data loss.
As your data grows, manual backups become more cumbersome, and if you’re backing up to external devices, this requires extra effort (not to mention they can become damaged). If you change your mind, you can re-enable auto backups anytime.
To manually trigger a backup, follow the previous steps for automated backups, but select Back up now at the final step. To disable auto backups, toggle the switch next to Backup by Google One to Off.
Managing your storage space
Don’t drop the (backup) ball. Properly managing your backups is essential for the safety of your data, so follow these tips:
-
Back up regularly: Back up regularly, or check that your auto-backups are working, to make sure that all your data, even the latest, is consistently secured. If you’re also backing up to a local drive, use calendar reminders to schedule and check on your regular backups.
-
Monitor storage space: This helps avoid dreaded backup interruptions due to full capacity. For Google One, regularly check your storage usage via the app and upgrade your Google storage plan if necessary.
-
Clear clutter: Regularly free up space on your device by deleting old files and apps, so you don’t need to run an emergency backup just to clear space. An automated maintenance tool like AVG Cleaner makes light work of this spring clean. It helps remove digital clutter like bloatware and junk files to free up your phone’s SD card memory and internal memory, so you’ll have lots of space for the digital memories you cherish (like your latest birthday pics).
How to restore data on your Android device
Whether you want to populate a brand-new phone with your data or need to recover deleted texts from your Android, here’s how to restore a backup. If you’re trying to remove a malware infection, pick a backup that’s far enough in the past, otherwise you risk reinfecting your device.
For new devices
Unless you want to start with a blank slate, you’ll need to restore a backup to your new device during the setup process. If you synced data to your Google account, sign in with the same account on your new phone, and your data will automatically sync.
Depending on the Android version your new device is running, the steps will vary. But, most modern cell phones automatically prompt you to restore backups from your existing phone when setting it up, either through Google One or device-to-device sync.
Note:
If your new phone is running a much older Android OS, you risk an incomplete data transfer. Remember to regularly check and update your Android.
For existing devices
You’ll have your reasons for bringing out the big guns and erasing your data and apps via a factory reset. Perhaps you’re facing serious performance issues or suspect your Android is a victim of spyware or other malware.
Here’s how to restore a Google backup after performing a factory reset. Connect to Wi-Fi and sign into your Google account. Then:
-
Hit Start on the Welcome screen.
-
Go to Copy apps & data. In the window that opens, hit Next. The Use your old device window opens.
-
Choose Can’t use old device or Next.
-
Sign in with your Google account. The most recent backups will appear, with a date and time stamp. Select a backup and hit Next.
-
Enter the PIN for the old device used for the backup.
-
Choose which files to restore from the list, and hit Restore.
From Google Drive
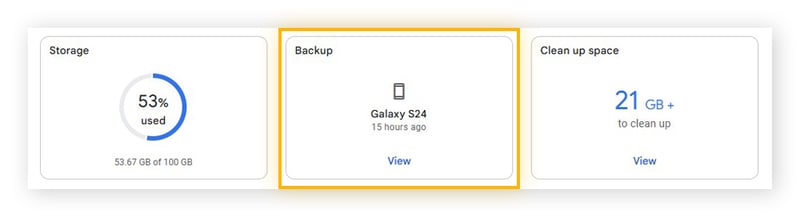
You have two options when restoring a Google Drive backup: You can restore it when setting up a new device (follow the on-screen prompts to restore your data from Google One) or after setup using the Google One website. After setup, you can manage and restore backups through the Google One website.
-
Go to the Google One website and sign in to your Google account.
-
Click the Backup tab.
-
Click the Manage backups link.
-
Click the Restore button next to the backup you want to restore.
-
Follow the on-screen instructions to restore your backup.
You can also copy data from an iPhone to a new Android device.
Back up and restore your data with a Samsung account
You can use Samsung Cloud to back up data to your Galaxy device.
-
Open the Samsung Cloud app.
-
Select Back up data.
-
Choose which items to back up to Samsung Cloud, then hit Back up now.
-
Tap Done.
If your data is already backed up in Samsung Cloud, you can restore your Galaxy phone after a factory reset or transfer files when setting up a new Galaxy device.
-
Open the Samsung Cloud app.
-
Select Restore data.
-
Select a backup.
-
Choose the data you want to restore, and tap Restore.
-
Tap Done.
Clear unnecessary phone data with AVG
Over time, devices become clogged with duplicate and temporary files, cache, and other digital junk. Clearing away the excess “weight” can result in a leaner, speedier device that operates more efficiently — and even conserves battery life. By freeing up storage, you’ll have more space for the files that really matter. Get AVG Cleaner for Android to help automate this spring clean, saving you time and effort.